


FR566DG-INS-LAB-RevC13: Deluxe Clinical Care Recliner Assembly and Operating Instructions 16
Heat and Massage Unit Setup Instructions
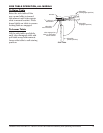
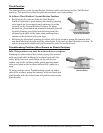
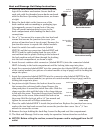
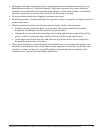
1. Place the back cushion over the vertical bayonet
lugs of the recliner mechanism. Secure back on
each side with the threaded screw knobs enclosed
with the Recliner Operating Instructions, as shown
at right.
2. Raise the back skirt on the lower rear of the
back cushion and use masking or packaging tape
to temporarily secure it up and out of the way.
This will permit uninterrupted access to the
back compartment while making the nal cable
connections.
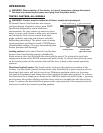
3. Use a
1
/4" hex wrench to remove the two hex head
screws that secure the junction box cover (see
picture of junction box at top of page). Remove the
junction box cover to expose the control module.
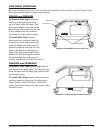
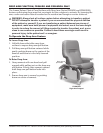
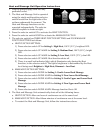
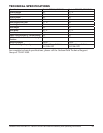
4.
Insert the switch box cable connector (labeled
SWITCH) and the two connectors (labeled HEAT and
HEAT A) and the cable leading from the rear of the
seat cushion into the plastic bushing in the bottom of
the back cushion and pull them through the bushing
into the back compartment, as shown at right.
5. Insert the seat cushion cable connector (labeled HEAT A) into the connector labeled
HEAT A already in the back compartment until its locking tabs snap into place.
6. Insert the connector labeled HEAT into the connector also labeled HEAT in the left side
of the control module (see picture of control module at top of page) until its locking tab
snaps into place.
7. Insert the connector labeled SWITCH into the connector also labeled SWITCH in the
right side of the control module (see picture of control module at top of page) until its
locking tab snaps into place.
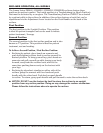
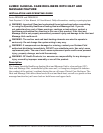
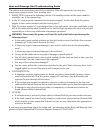
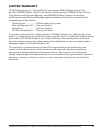
8.
See picture at right. Remove the lock nut from the screw
that secures the cushioned cable clamp. Remove the
clamp and place it around the switch box cable. Slide the
clamp over the cable until the holes in the clamp tabs are
in line with the screw. Then pinch them closed. Install the
clamp tabs on the screw, then reinstall the lock nut on
the screw. Hold the lock nut with a
3
/8" hex wrench and
tighten the screw with a Phillips screwdriver.
9. Place the cable labeled HEAT A inside the junction box. Replace the junction box cover;
replace the two hex head screws that secure the junction box cover. Use a
1
/4" hex
wrench to secure the screws.
10. Remove the tape holding the back ap. Lower the ap and seal the compartment.
11. The Heat and Massage Unit is now ready for operation. Instructions for use follow.
s
Secure Back Cushion to
Recliner Mechanism
Knob
recliner
mechanism
knob
Insert cables through
back cushion bushing
back cushion
bushing
cables
Secure Switch Box
cable clamp
switch box cable clamp
screw
lock nut
clamp tabs