


9
MODEL 430 DO SECTION 3.0
MAINTENANCE
SECTION 3.0
MAINTENANCE
3.1 GENERAL. Sensor maintenance consists of keep-
ing the sensor clean, recharging the sensor and
replacing the membrane. The sensor should be
cleaned with clean water and a soft cloth. Make sure
the membrane area is kept clean and free of any
accumulation of dirt, algae, fungus, hair, etc.
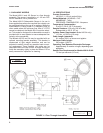
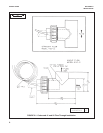
3.2 RECHARGING THE SENSOR. A recharge kit
(Rosemount analytical P/N 2002473) is required to
service the sensor.
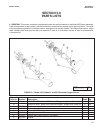
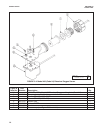
Recharge the sensor as follows (see Figure 5-2):
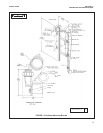
1. Remove the sensor from its mounting.
2. Loosen the vent screw approximately 1-1/2 turns.
DO NOT REMOVE IT
3. Unscrew and remove the reservoir retainer from
the base. Use a strap wrench if the retainer is to
tight to remove by hand.
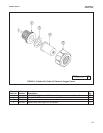
4. Pull the reservoir housing assembly from the base
WITHOUT rotating it. Hold sensor in a base-up
position to keep electrolyte from spilling out. If the
reservoir housing assembly is locked onto the
base, use a screwdriver at the parting lines to dis-
lodge the base from the reservoir housing assem-
bly. Do not damage the mating surfaces with the
screwdriver while separating the base from the
reservoir housing assembly.
CAUTION
The electrolyte (KCI) is a corrosive liquid
which could damage some materials and
may irritate the skin or eyes. If the electrolyte
comes in contact with the skin or eyes, wash
immediately with clean water.
5. Discard the O-ring, electrolyte, and reservoir
housing assembly.
6. Prepare the electrolyte solution as follows:
a. Pour electrolyte crystals into a beaker containing
100 milliliters of distilled or demineralizer water.
Stir until crystals are dissolved.
b. If it is desired to forego the stabilization period of
two hours, a dilution of the electrolyte may be
done by adding NaOH or KOH to adjust the pH of
the solution to 12 or greater.
c. The unused electrolyte solution can be saved for
future use. The pH should be rechecked prior to
use if the solution has been stored.
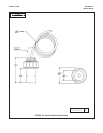
7. Fill the new reservoir housing assembly with elec-
trolyte to the hole in the inner wall of the reservoir
(approximately 3/4 full). Tap the reservoir lightly to
remove any air bubbles.
8. Rinse all parts of the base in distilled or deionized
water. To remove silver chloride from the silver
anode, use a fine grit sandpaper or a pencil eras-
er and rub lightly until the coating is removed.
Rinse the silver anode in distilled water until all
traces of grit are removed.
9. Lightly lubricate the O-rings with O-ring lube and
install the O-ring in the groove of the base.
10. Hold the reservoir housing assembly in an upright
position and carefully slide the base into the reser-
voir housing assembly, making sure the tip of the
post enters the membrane retainer. Some elec-
trolyte should seep out through the vent screw
while the reservoir housing assembly is being
pushed onto the base. Do not grip the pressure
compensator while pushing the reservoir housing
assembly onto the base.
CAUTION
In the following step, do not push the reser-
voir housing assembly onto the base too fast.
The orifices in the base vent screw are very
small and a quick surge of pressure could
damage the membrane. A stream of elec-
trolyte solution could be forced through the
vent screw while the reservoir housing
assembly is being installed.
11. Push the reservoir housing assembly onto the
base until the threads of the base and the reser-
voir retainer can be engaged. After the threads are
engaged, turn the reservoir retainer until it is fin-
ger-tight. Caution, over finger-tight may damage
membrane or base post.
NOTE
Do not touch or apply pressure to the mem-
brane.
12. Tighten the vent screw. Rinse the sensor with
clean water and dry with a lint-free cloth or towel.
13. The sensor is now ready for use.