


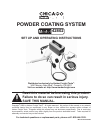

SKU 42802 For technical questions, please call 1-800-444-3353. Page 6
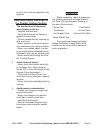
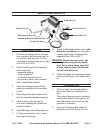
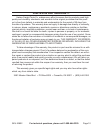
Trigger (7)
Pressure Reducer Valve (18)
Cup (4)
Scatter Tip (12)
Regulating Screw (14)
3. Unscrew the Cup (4) from the Spray
Gun (2) and ll with up to two inches
of coating powder (not supplied).
- Turn the Cup upside down and
place on a clean piece of paper.
- Put on a pair of disposal vinyl
gloves.
- Open the powder coating container,
and using a piece of clean paper as a
guide,
pour the powder into the Cup.
- Turn the Spray Gun upside down
and screw the Cup back into the
Spray Gun.
- Reseal powder container.
Note: Only use the provided cups with
this system. Other cups will not seal
properly.
Connect the 1/4 inch air hose to the 4.
Disposable Moisture Separator (8).
Attach the Ground Clip (10) to the 5.
metal object being coated.
Securely attach the Ground Clip to
an area which is not being coated if
possible. This connection is abso-
lutely necessary to draw the electri-
cally charged (power) particles to the
metal object.
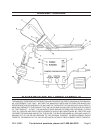
Spray Gun (2)
Connection
Pedal Switch
Connection (11)
Ground
Clip (10)
Connection
Power Switch (17)
Power
Indicator
Light (15)
Running
Indicator
Light (16)
Line Cord
6. Turn ON the Power Switch (17) of the
Control Box (1).
Turn ON the compressor and adjust 7.
the air pressure to between 20 and
40 PSI.
This can be done at the compressor
if it has a pressure value, or on the
Spray Gun by adjusting the Pressure
Reducer Valve (18).
Press the Spray Gun Trigger (7) and 8.
Pedal Switch (11) at the same time
and test the spray pattern on a piece
of scrap metal.
The Trigger controls the air and pow-
der ow. The Pedal Switch controls
the electrical charge. If the pattern
is too small or too large, change the
Scatter Tip (12). Remember that the
pointed end of the Scatter Tip faces
toward the Spray Gun and screws on.
The spray pattern can also be adjust-
ed using the Regulating Screw (14):
loosen to expand the pattern, tighten
to reduce the pattern size.
When coating, keep the Spray Gun 9.
approximately eight inches from the
metal object.
- Point the Spray Gun toward the ob-
ject at different angles to guarantee
that all areas are coated.
REV 09d