


4
8 Connect the mask elbow to the mask frame. To do this, firmly
push the mask elbow onto the mask frame until it clicks into
place (Fig. B-6).
Check that you have connected the mask elbow correctly by
rotating it. Be careful not to squeeze the sides of the elbow as
it may release from the mask frame. If the mask elbow is fitted
correctly, it should rotate freely and not separate from the
mask frame.
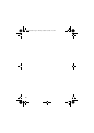
9 The fitted mask should look like this (Fig. B-7).
10 Turn your flow generator on. If you feel air leaks around the
cushion, reposition the mask on your face to achieve a better
seal. You may also need to readjust the headgear straps or
forehead support.
Do not over-tighten the straps. The straps should be adjusted
so that the A
CTIVECELL is moderately and evenly expanded as
shown in Figure B-8.
The A
CTIVECELL should not be collapsed (Fig. B-9) or over-
expanded (Fig. B-10).
Take time to adjust the straps and the position of the mask to
achieve a comfortable and secure fit. If you feel excessive
pressure on your nasal bridge or upper lip, adjust the
forehead support.
Note: Select ’Standard’ as the mask option, when using ResMed
AutoSet™ devices.
REMOVING THE MASK
To remove the MIRAGE ACTIVA mask, squeeze the headgear clips
(Fig. C-a). This releases the headgear clips from the mask frame.
Pull the mask and headgear away from your head.
Note: Do not pull the headgear off your head without releasing the
headgear clips first.
60880r2.book Page 4 Thursday, October 20, 2005 11:55 AM