


15
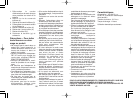
WARNING for Lithium Battery:
Fire, explosion, and severe burn
hazard.
Do not crush, disassemble, heat
above 100°C (212°F), or incinerate.
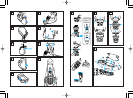
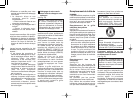
How to remove the built-in
rechargeable battery before
disposal of the shaver
(see fig. 22)
WARNING – Do not attempt to re-
place the battery for the purpose
of reusing the shaver. This could
result in the risk of fire or electric
shock.
The battery in this shaver is not in-
tended to be replaced by consum-
ers. However, the battery may be re-
placed at an authorized service
center. The procedure described be-
low is intended only for removal of
the rechargeable battery for the pur-
pose of proper disposal.
1. Disconnect the power cord from
the shaver when removing the
battery.
2. Remove the bottom cover screw
(a).
3. Remove the bottom cover (b).
4. Slide the back panel (c) and re-
move it.
5. Remove the housing clip (d).
6. Remove the four housing screws
(e).
7. Remove the housing B (f).
8. Lift the battery (g) and remove it.
Caution – To prevent
personal injury or damage
to the product,
• Do not charge the shaver, where it
will be exposed to direct sunlight
or a heat source, or where there is
a lot of moisture.
• Use only the included adaptor
RE-7-27 to charge the ES8078/
ES8077/ES8076/ES8075 shaver.
• Dry the shaver completely before
charging it.
• Keep the adaptor away from water
and handle it only with dry hands.
• Grip the adaptor when disconnect-
ing it from an AC outlet; tugging on
the power cord may damage it.
• Do not pull, twist, or severely bend
the power cord.
• Do not wrap the power cord tightly
around the appliance.
• If the power cord gets damaged, it
alone cannot be replaced. Contact
an authorized service center.
• Store the adaptor in a dry area
where it will be protected from dam-
age.
• The shaver and adaptor will be-
come slightly hot during use or
charging, however this is not a
malfunction.
• In cases where static noise is emit-
ted from the television during use
charging or cleaning, connect the
adaptor to a different outlet.
• Do not touch the edge (metal part)
of the inner blade.
Failure to observe this may lead to
hand injuries.
15
14
2 Cleaning your shaver without
the self-cleaning recharger
(see fig. 19)
Warning – To prevent electric
shock or personal injury, turn the
shaver off and disconnect the
power cord from the shaver before
cleaning with water.
With the system outer foil in place,
apply some hand soap onto the outer
foil.
Push the On/Off switch more than 2
seconds to activate the turbo mode
for “sonic” vibration cleaning.
At the same time, the lamps of the
Battery capacity monitor (ES8078,
ES8077, ES8076), Low battery indi-
cator/Charge status lamp (ES8075)
will flash around randomly.
Pour some water over the outer foil.
After about 20 seconds, it will be
automatically turned off, or you can
turn it off by pushing the On/Off
switch.
Remove the system outer foil and
push the On/Off switch more than 2
seconds to activate the turbo mode
for “sonic” vibration cleaning and
clean it with running water.
Wipe off any moisture from the
shaver with a dry cloth and dry it with-
out the system outer foil.
Replacing shaving head
components
It is recommended that you replace
the system outer foil at least once a
year and the inner blade at least once
every 2 years to maintain your shav-
er’s cutting performance.
Replacing the system outer foil
(see fig. 20)
Squeeze the system outer foil
release buttons and lift the system
outer foil upward to remove it. To
insert the new system outer foil,
press down until it snaps into place.
• Check that the gaps on both sides
of the system outer foil release
buttons and the system outer foil
are equal. If they are not equal,
there is a chance that the system
outer foil will become detached
during use, or shaving capabilities
will be deteriorated.
Replacing the inner blades
(see fig. 21)
Squeeze the system outer foil
release buttons and lift the system
outer foil upward to remove it. Re-
move the inner blade one at a time
by grasping it firmly at both ends and
pulling straight away from the shaver.
Do not touch the metal parts of inner
blades.
To insert the new inner blade, hold
the blade one at a time at both ends
and press downward until it snaps
into the shaver.
ATTENTION:
A Lithium-ion battery that is recy-
clable powers the product you
have purchased. Please call
1-800-8-BATTERY for information
on how to recycle the battery.
14