


9
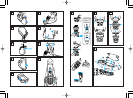
cleaning recharger securely (see
fig. 13, 14, 15).
2. Insert the appliance plug into the
socket (see fig. 16-1).
3. Firmly insert the adaptor into the
AC outlet (see fig. 16-2).
In some areas, a special plug
adaptor may be required.
4. Pull up the arm of the self-clean-
ing recharger until it clicks (see
fig. 17-3).
5. Remove the protective cap and
set the shaver firmly onto the self-
cleaning recharger until it clicks
(see fig. 17-4).
• The Self-cleaning recharger is
set on the (Charge) mode when
the shaver is set on.
• Do not push the arm down-
wards.
• Ensure that the outer foil does
not get deformed or damaged
when placing the shaver into the
self-cleaning recharger.
Note
• Use the self-cleaning recharger in
environments that do not exceed
ambient temperatures of 15 to
35 °C and humidity levels of 95%.
• If it is far below or over the appro-
priate temperature, the charging
time may extend, or the Self-clean-
ing recharger may not function.
•
• When charging the shaver for the
first time or when it has not been in
nate for a few minutes after opera-
tion. It will eventually illuminate if
kept connected.
[for ES8078, ES8077, ES8076]
The charge status lamp will glow
when the shaver is being charged.
The battery capacity monitor will fully
illuminate and the charge status lamp
will blink after charging is completed
(see fig. 4 (A)).
You can fully charge the shaver in 1
hour if the LED display shows “low”.
The battery capacity monitor indi-
cates the charge remaining in the
battery in 3 levels (high/mid/low). The
unit can be used once or twice more
after “low” starts to blink. (Differs de-
pending on usage.)
[for ES8075]
The charge status lamp will glow
when the shaver is being charged.
It will blink when charging is com-
pleted (see fig. 4 (D)).
You can fully charge the shaver in 1
hour if the low battery indicator blinks
(see fig. 4 (C)).
The unit can be used once or twice
more after the low battery indicator
starts to blink.
A full charge will supply enough
power for approx. 14 shaves (3 min-
utes per shave for a normal beard).
It will be adjusted automatically to
voltages between 100-240V AC.
In particular, low temperature may
shorten the life span of the
rechargeable battery. In this case, the
charge status lamp blinks twice per
10 minutes after charging is
completed, the battery capacity
monitor will turn off and the charge
status lamp will continue to blink (see
use for more than 6 months, the
charge status lamp may not illumi-
•
Even when you select the (Clean/
Dry) course or (Dry) course, the
shaver might be charged by the
self-cleaning recharger.
9
8
Before use
This Wet/Dry shaver can be used for
wet shaving with shaving lather or for
dry shaving. You can use this water-
tight shaver in the shower and clean
it in water. The following is the sym-
bol of Wet shaver. The symbol means
that hand-held part may be used in
a bath or shower.
Treat yourself to wet lather shaves
for at least three weeks and notice
the difference. Your Panasonic Wet/
Dry shaver requires a little time to get
used to because your skin and beard
need about a month to adjust to any
new shaving method.
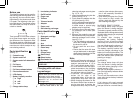
Parts identification 1
(see fig. 1)
A Protective cap
B System outer foil
C System outer foil release but-
tons
D Foil frame
E Inner blades
F Foil frame release buttons
G Pivot action selector
H LED display
I Battery capacity monitor
I-a high
I-b mid
I-c low
J Charge status lamp
K Low battery indicator
L On/Off switch
M Finger rest
N Trimmer
O Trimmer handle
P Adaptor
Q Power cord
R Self-cleaning recharger
Parts identification 2
(see fig. 2)
S Detergent cartridge
T Water tank
U Socket
V Arm
W Water tank cap
X Clean lamp
Y Dry lamp
Z Charge lamp
Status lamp
Select button
Feed water line
READ ALL INSTRUCTIONS BE-
FORE USE.
Charging with self-clean-
ing recharger
Before each use, ensure that the
recharger unit is clean and dry.
Thoroughly wipe off any water or
moisture on or around the
recharger unit.
1. Attach the detergent cartridge
and the water tank to the self-
8