


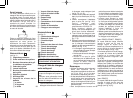

11
among many other shaving aids (gel,
soap, cream, etc.). Do not put a thick
layer of shaving foam as it may af-
fect shaver’s performance. If the
shaving head is clogged with foam,
simply rinse it under running water.
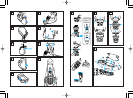
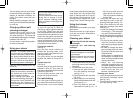
Using the trimmer
(see fig. 9)
Slide the trimmer handle up to open
the trimmer.
Place the trimmer at a right angle to
your skin and move it downward to
trim sideburns.
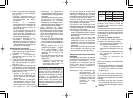
Cleaning your shaver
1 Cleaning with the self-cleaning
recharger
Preparing the self-cleaning
recharger
Warning – Do not wash or apply
water to the adaptor or self-clean-
ing recharger.
Failure to observe this may cause
electric shock or result in short
circuits.
1. Detach the shaver and the appli-
ance plug from the self-cleaning
recharger.
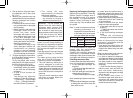
2. Fill the water tank with water.
1) Remove the water tank from
the self-cleaning recharger
(see fig. 10-1).
2) Open the water tank cap (see
fig. 10-2).
3) Wash away the old cleaning
liquid inside the water tank and
rinse (see fig. 11).
4) Pour tap water up until the
feed water line (see fig. 12).
* Do not pour water over the
water feed line in the tank.
This may cause the cleaning
liquid to spill.
3. Firmly shut the water tank cap
and attach the tank to the self-
cleaning recharger (see fig. 13).
4. Peel off the seals from the new
detergent cartridge (two seals)
(see fig. 14).
• Hold the detergent cartridge
horizontally. (The detergent
may spill if tilted excessively.)
5. Attach the detergent cartridge to
the self-cleaning recharger (see
fig. 15).
• Do not use any solution other
than the Panasonic Shaver
self-cleaning recharger special
detergent.
• Be sure to change the deter-
gent cartridge and the clean-
ing liquid inside the water tank
simultaneously.
Adding water, or changing just
the detergent cartridge or the
water, will result in deteriorated
cleaning functions.
• When the self-cleaning
recharger is operated, the con-
centrated detergent inside the
cartridge will be diluted and the
water inside the tank will
become a cleaning liquid.
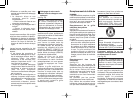
Cleaning your shaver
1. Insert the appliance plug into the
self-cleaning recharger socket
(see fig. 16-1).
2. Firmly insert the adaptor into the
AC outlet (see fig. 16-2).
11
10
You can always connect your shaver
to the self-cleaning recharger or the
adaptor to maintain full battery ca-
pacity. This shaver cannot be over-
charged.
Before travelling, charge it fully for 1
hour if you will not be taking the adap-
tor with you.
Charging without self-
cleaning recharger
Connect the power cord to the
shaver, and plug the adaptor to an
AC outlet (see fig. 5). The shaver will
be adjusted automatically to voltages
between 100-240V AC.
In some areas, a special plug adap-
tor may be required.
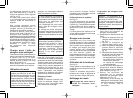
Using your shaver
Caution – The system outer foil is
very thin and can be damaged if
handled improperly. Before each
use, always check the foil for dam-
age. To avoid personal injury, do
not use if the foil or other parts of
the shaving head are damaged.
Push the On/Off switch to turn the
shaver on.
If you push and hold the On/Off
switch for more than 2 seconds, it
will activate the turbo mode for
“sonic” vibration cleaning.
(see “Cleaning your shaver with-
out the self-cleaning recharger”)
Shaving with “sonic” vibration may
damage your skin. Please turn it
off and on again to deactivate the
turbo mode.
Do not place fingers on the On/Off
switch during use.
This may cause the shaver to stop
during use or change it to the
“sonic” vibration cleaning mode.
Place your finger on the finger rest
during use.
Hold the shaver at a right angle (90°)
to your skin (see fig. 6). Start out
shaving by applying gentle pressure
to your face. Stretch your skin with
your free hand and move the shaver
back and forth in the direction of your
beard. You may gently increase the
amount of pressure as your skin be-
comes accustomed to this shaver.
Applying excessive pressure does
not provide a closer shave.
Pivot action selector
(see fig. 7)
Use the pivot action selector to
choose the shaving mode, “soft”
(soft) and “lock” (lock) based on your
shaving preference.
The pivot action can be changed
whether the switch is turned on or
off.
System outer foil
(see fig. 8)
System outer foil has a slit blade (a)
between 2 foils (b). They move up
and down independently to follow the
contours of your face.
The slit blade catches and cuts
longer and lying hairs easily.
For wet shaving
Put a thin layer of shaving foam on
your face which works as a lubricant.
Shaving foam is the most suitable
10