


[3] DISASSEMBLY/ASSEMBLY
[3] -4. Die and Punch
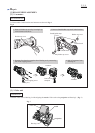
DISASSEMBLING
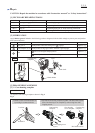
Fig. 8
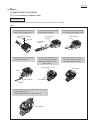
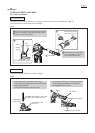
Fig. 9
Die holder
1 Pull off Die holder from Gear housing complete.
2 Remove Punch by loosening M5x8 Hex socket
set screw with Hex wrench.
3 Remove Die from Die holder
by unscrewing two M3x12
Hex socket head screws.
(1) Remove Lock nut with Wrench 32 by turning it counterclockwise. (See the left drawn in Fig. 2)
(2) Disassemble Die and Punch as drawn in Fig. 8.
Hex
wrench
M5x8 Hex socket set screw
Assemble Punch and Die holder as drawn in Fig. 9.
concave for fitting the screw end
of M5x8 Hex socket set screw
screw hole of
Punch holder
1. Insert Punch into Punch holder until it stops
while aligning its concave portion with the screw
hole of Punch holder.
And tighten M5x8 Hex socket set screw.
Punch
Punch
holder
Die
M3x12 Hex socket
head screw (2 pcs.)
M5x8 Hex socket
set screw
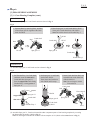
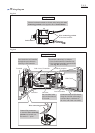
2. Assemble Die holder to Gear housing complete
while aligning the window of Die holder to
the stepped portion of Punch.
Die holder
window of Die holder
stepped portion of Punch
Punch
ASSEMBLING
1
2
3
P 6/ 8
Repair