


8
O
P
E
R
A
T
I
O
N
OPERATION
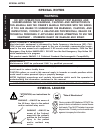
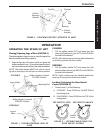
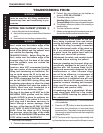
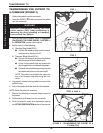
FIGURE 3 - RAISING/LOWERING
STAND UP LIFT
Control
Box
Red Emergency Stop Button
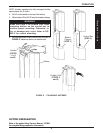
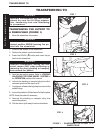
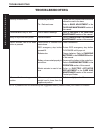
MOUNTING BATTERY CHARGER
(FIGURE 4)
NOTE: Refer to your local regulations concerning proper
mounting procedures.
1. Place the battery charger with mounting bracket on
the wall at the desired position.
2. With a pencil, mark the MIDDLE hole position.
3. Measure down 16.5 cm from the pencil mark and drill
one (1) mounting hole.
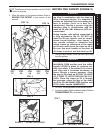
FIGURE 4 - MOUNTING BATTERY CHARGER
Hand Control
UP Button
DOWN Button
Press IN to Stop
Lift Arms
Rotate CLOCKWISE to
Disengage Emergency Stop
BOTTOM
Mounting
Screw
(STEP 4)
Battery Charger with Mounting
Bracket (STEP 5)
Mounting
Screws
(STEP 7)
Mounting Bracket
(STEP 6)
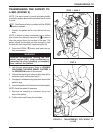
CHARGING BATTERIES (FIGURE 5)
NOTE: Invacare recommends the battery be recharged
daily.
NOTE: An audible alarm will sound (horn will beep) when
battery is low.
1. Lift UP on the handle on the top of the battery.
2. Lift the battery UP and OUT away from control box.
WARNING
Make sure there is an audible click when
mounting battery on the battery charger
to confirm proper mounting. Otherwise,
injury or damage may occur. Refer to FIG-
URE 5 for correct mounting.
3. Place the battery on the battery charger as shown in
FIGURE 5. Make sure there is an audible click.
NOTE: The charge LED will illuminate.When charging is
complete, the charge LED will stop illuminating.
Raising/Lowering Stand Up Lift
(FIGURE 3)
RAISING THE LIFT. Press the UP (
ÏÏ
ÏÏ
Ï) button on the
hand control to raise the lift arms and the patient.
LOWERING THE LIFT. Press the DOWN (
ÐÐ
ÐÐ
Ð) button
on the hand control to lower the lift arms and the patient.
NOTE: If the Stand Up Lift is in the full UP position, it
may be necessary to pull down slightly on the lift arms
before the mast will lower.
EMERGENCY STOP. Press the RED button on the
control box IN to stop the lift arms and patient from raising
or lowering.
NOTE: Rotate RED emergency stop button CLOCK-
WISE until it pops out to disengage.
4. Install the BOTTOM mounting screw until there is an
approximate 3 mm gap between the screw head and
the wall.
5. Install the battery charger with mounting bracket
onto the bottom mounting screw.
6. Drill the remaining two (2) mounting holes.
7. Install the two (2) remaining mounting screws
through the mounting bracket and into the wall.
Tighten securely.
8. Plug battery charger into the wall electrical outlet.
NOTE: ON LED should illuminate.