


19
C
A
R
E
-
M
A
I
N
T
E
N
A
N
C
E
CARE AND MAINTENANCE OF YOUR STAND UP LIFT
REPLACING CASTERS AND/OR
FORKS (FIGURE 7)
WARNING
Casters and axle bolts require inspection
every six (6) months to check for tight-
ness and wear.
Rear Caster
1. Place the stand up lift on its side.
2. Remove the bolt and locknut that secure the existing
rear caster to the fork.
NOTE: The bushing will fall out of the rear caster.
NOTE: Existing bushing will be reused. Examine and re-
place if worn.
3. Install new/existing bushing into the new rear caster.
4. Line up the mounting holes in the new rear caster and
the fork.
5. Install the bolt through the fork and new rear caster
and tighten securely with the locknut.
Front Casters
1. Place the stand up lift on its side.
2. Remove the bolt and locknut that secure the existing
front caster assembly to the fork.
NOTE: The front caster assembly consists of two (2) cast-
ers and a washer in between.
NOTE: The washer will fall out from between the two (2)
casters.
NOTE: Existing washer will be reused. Examine and re-
place if worn.
3. Position new/existing washer between the two (2) new
casters.
4. Line up the mounting holes in the new front caster
assembly and the fork.
5. Install the bolt through the fork and new front caster
assembly and tighten securely with the locknut.
Forks
1. Place the stand up lift on its side.
2. Remove the front or rear caster from the stand up lift.
Refer to REPLACING CASTERS in this section of
the manual.
3. Unscrew the existing fork from the base.
4. Install the new fork onto the base.
5. Install the front or rear caster onto the stand up lift.
Refer to REPLACING CASTERS in this section of
the manual.
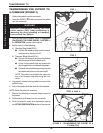
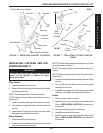
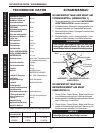
FIGURE 7 - REPLACING CASTERS AND/OR
FORKS
REAR
FRONT
Bolt
Bushing
Rear
Caster
Locknut
Fork
Base
Base
Front
Casters
Locknut
Fork
Bolt
Washer
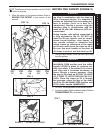
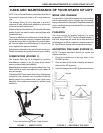
Lift Arm Mounting Bracket
FIGURE 6 - REPLACING ELECTRIC ACTUATOR
Bottom Nut
Washer
Shoulder Bolt
Electric
Actuator
Top Nut
Top
Bolt
Bushing
Bracket
Mast Mounting Bracket