


18
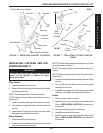
REPLACING THE KNEE PAD
(FIGURE 3)
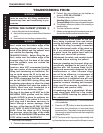
1. Remove the four (4) button screws and washers that
secure existing knee pad to the stand up lift.
2. Remove the existing knee pad from stand up lift.
3. Position the mounting holes in the new knee pad with
the mounting holes in the stand up lift.
4. Using the existing hardware, secure the new knee
pad to the stand up lift.
5. Position the mounting holes in the knee pad with the
mounting holes in the stand up lift.
6. Using the existing hardware, secure the knee pad and
new leg strap to the stand up lift.
REPLACING THE PADDED COVER
(FIGURE 5)
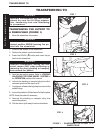
1. Pull fastening strips on the existing padded cover apart.
2. Remove the existing padded cover from the lift arm.
3. Position the new padded cover around the lift arm.
4. Secure fastening strips on the new padded cover to-
gether.
REPLACING OPTIONAL LEG
STRAP (FIGURE 4)
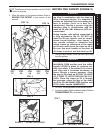
1. Remove TOP (2) button screws and washers that
secure knee pad and existing leg strap to stand up lift.
2. Loosen BOTTOM two (2) button screws and wash-
ers that secure knee pad and existing leg strap to
stand up lift.
3. Remove the existing leg strap from stand up lift.
4. Position the new leg strap between the four (4) mount-
ing holes as shown in FIGURE 4.
NOTE: Make sure there is equal amounts of leg strap on
either side of the stand up lift.
C
A
R
E
-
M
A
I
N
T
E
N
A
N
C
E
CARE AND MAINTENANCE OF YOUR STAND UP LIFT
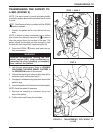
REPLACING ELECTRIC
ACTUATOR (FIGURE 6)
1. Remove the bottom nut, washer and shoulder bolt
that secure the electric actuator to the mast mounting
bracket.
2. Rest the lift arm on your shoulder and remove the top
nut, bolt, bracket and bushing from the lift arm mount-
ing bracket.
3. Remove the electric actuator.
4. Reverse STEPS 1-3 for installation of the new elec-
tric actuator.
CAUTION
DO NOT overtighten mounting hardware.
This will damage mounting brackets.
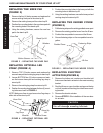
FIGURE 3 - REPLACING THE KNEE PAD
Knee Pad
Button Screws
Washers
Stand Up Lift
FIGURE 4 - REPLACING OPTIONAL LEG
STRAP
Leg Strap
Knee Pad
Button Screw
Washer
Stand Up
Lift
FIGURE 5 - REPLACING THE PADDED COVER
Padded Cover
Lift Arm
Fastening Strips