


3
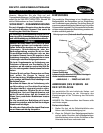
Seat Cover
Front
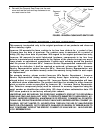
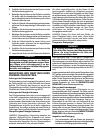
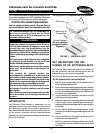
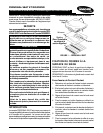
FIGURE 2 - INSTALL RIGIDIZER
Bottom of
Personal
Seat Foam
Adhesive with
Protective Paper
Rear
Cushion Rigidizer
(1 inch/1.25cm
behind FRONT
edge.)
Personal Seat
Foam
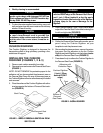
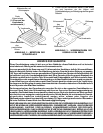
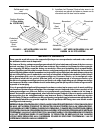
FIGURE 1 - REMOVE PERSONAL SEAT FOAM FROM
SEAT COVER
4. Weekly cleaning is recommended.
CAUTION
MACHINE WASH seat cover in cold water on
gentle cycle using a mild detergent. DO NOT use
fabric softeners or bleach. DO NOT machine dry.
Air dry ONLY. DO NOT dry in sun.
5. To clean the water repellant foam coating, use a soft
cloth and wipe clean with warm water and a mild soap
solution. Rinse off and dry.
CAUTION
The cover is designed to protect the foam against
a user’s incontinence and to provide fire
retardency so the cushion must not be used with-
out its cover. If the cover is torn, it must be re-
placed.
CUSHION RIGIDIZER
The Cushion Rigidizer is designed to decrease the
hammocking effect of sling upholstery, providing a firm,
stable base of support.
INSTALLING THE CUSHION
RIGIDIZER (FIGURES 1, 2 & 3)
1. Remove seat cushion assembly from chair.
2. Open seat cover and remove the Personal Seat Foam
(FIGURE 1).
NOTE: DO NOT REMOVE the protective paper for the
adhesive until you have marked the placement area on
the Personal Seat Foam. Be sure of placement area as
the Cushion Rigidizer will not re-adhere securely if installed
and removed.
3. Place the surface of the Cushion Rigidizer with adhe-
sive tape against the bottom of Personal Seat cush-
ion (FIGURE 2).
WARNING
The FRONT edge of the Rigidizer MUST be parallel
with the FRONT edge of the Personal Seat Foam
and 1 inch (1.25cm) behind it so that the user's
legs will not contact the front edge of the Rigidizer
causing injury to the user or damage to the
Rigidizer.
4. Place Cushion Rigidizer 1 inch (1.25cm) from FRONT
edge of the Personal Seat Foam while centering it on
the left and right sides (FIGURE 2).
CAUTION
DO NOT cut or rip the foam coating.
5. Outline the Personal Seat Foam with a marker, pen or
pencil using the Cushion Rigidizer as your
template to mark the placement area.
6. After marking the placement area, remove the protec-
tive paper from the adhesive on the the Cushion
Rigidizer and install Rigidizer onto the bottom (under-
side) of the Personal Seat Foam (FIGURE 2).
7. Press down firmly to adhere the Cushion Rigidizer to
the Personal Seat Foam (FIGURE 2).