


4
USA/UK ENGLISH
PERSONAL BACK MAINTENANCE
WARNING
DO NOT continue to use this product if
problems are discovered. Corrective
maintenance can be performed at or ar-
ranged through your equipment supplier.
Cleaning Instructions
BACK ASSEMBLY.
Clean weekly with dampened cloth. Wipe entire surface.
Weekly visual inspection of parts including hardware,
brackets, upholstery materials, foams (if accessible),
and plastics, for deformation, corrosion, breakage,
wear or compression.
Check ALL fasteners weekly to ensure that mechani-
cal connections are secure.
USE OF THE PERSONAL BACK
The Personal Back includes a movable foam lumbar
and left and right foam laterals attached to the back
shell with hook and loop fasteners to provide additional
positioning capability. To access the lumbar and the
laterals, unzip the cover and push the foam forward,
away from the back of the shell. The lumbar and later-
als will then be accessible for making adjustments.
PERSONAL BACK/PERSONAL
BACK PLUS INSTALLATION
(FIGURE 5)
WARNING
The position of the Personal Back in the three
(3) different mounting bracket slots is directly
related to the chair's stability. When the Per-
sonal Back is added to a TILT and/or RECLIN-
ING chair, it may cause a decrease in the
chair's stability. It may be necessary to repo-
sition the FRONT CASTERS, REAR WHEELS, BACK
ANGLE, TILT-IN-SPACE, RECLINE POSITION and/
or SEAT DEPTH before use. Use EXTREME cau-
tion when using a new seating position.
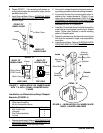
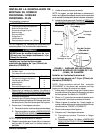
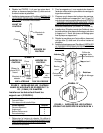
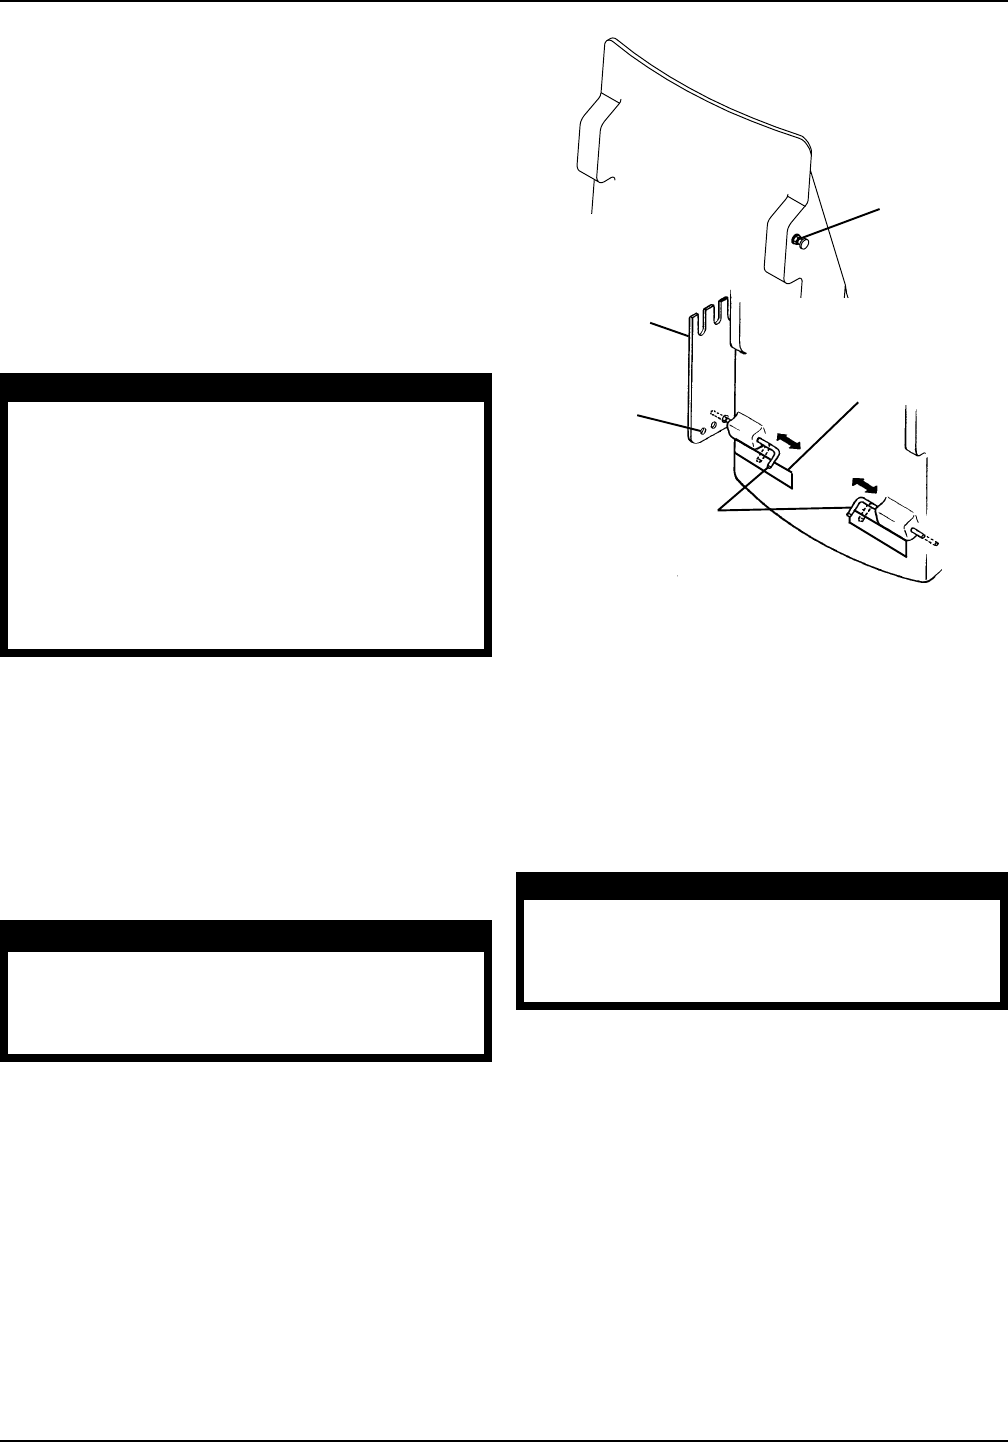
FIGURE 5 - PERSONAL BACK/PERSONAL BACK
PLUS INSTALLATION
Headrest Installation
Headrests may be installed on the Personal Back. The
Headrest Reinforcement Plate MUST be used and is
available separately.
1. Install the Personal Back onto the mounting plate so
that the upper studs locate into the appropriate slots.
2. Turn bottom mounting pin until tear drop aligns with
mounting hole.
3. Install bottom mounting pins into one (1) of the three
(3) sets of tear drop holes in the bottom of the mount-
ing bracket.
4. To lock, rotate the mounting pins to the downward
position.
WARNING
Make sure hook and loop straps are se-
curely holding the levers. The Personal
Back may come loose if the levers are
not locked down.
5. Secure mounting pins from rotating with hook and
loop straps on back of cover.
6. To remove the Personal Back, reverse STEPS 1-5.
NOTE: Mark the upper and lower mounting positions of
the Personal Back mounting bracket for reference by fam-
ily or caregivers.
Stud
Mounting Pin
Push and Turn to
Release Back
Mounting
Bracket
Hook and
Loop Strap
Mounting
Hole