


SECTION 7—MAINTENANCE
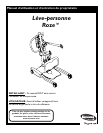
Part No. 1150703 23 Roze™ Stand Up Patient Lift
Cleaning the Sling and the Lift
The sling should be washed regularly in water temperature not exceeding 180°F (82°C) and a biological solution. A soft
cloth, dampened with water and a small amount of mild detergent, is all that is needed to clean the patient lift. The lift can
be cleaned with non-abrasive cleaners.
Detecting Wear and Damage
It is important to inspect all stressed parts, such as slings, lifting arm and any pivot for slings for signs of cracking, fraying,
deformation or deterioration. Replace any defective parts IMMEDIATELY and ensure that the lift is not used until repairs
are made.
Lubricating the Lift
The Invacare lift is designed for minimum maintenance. However, a six month check and lubrication should ensure
continued safety and reliability.
Keep lift and slings clean and in good working order. Any defect should be noted and reported to your dealer as soon as
possible.
The casters MUST swivel and roll smoothly. A light grease (waterproof auto lubricant) may be applied to the ball bearing
swivel of the casters once a year. Apply more frequently if the casters are exposed to extreme moist conditions.
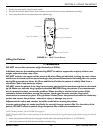
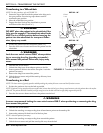
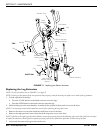
Replacing the Electric Actuator
NOTE: For this procedure, refer to FIGURE 7.1 on page 24.
1. Unplug the electric actuator from the control box on the mast assembly. Thread the actuator lead through the actuator
lead routing hole in the mast assembly.
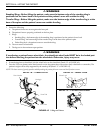
2. Remove the hardware that secures the top of the electric actuator to the lift arm actuator mounting bracket.
A. Remove the rubber caps from the nut and screw that attach the electric actuator to the lift arm actuator mounting
bracket.
B. Remove the screw, washer, bearing, nylon washer, actuator cap, bushing, nylon washer, bearing, washer, flat washer
and nut.
NOTE: The actuator cap will become loose when the attaching hardware is removed. Inspect the actuator cap for damage. Replace the
actuator cap if damage is found.
3. Remove the hardware that secures the bottom of the electric actuator to the mast assembly actuator mounting bracket.
A. Remove the rubber caps from the nut and screw that attach the electric actuator to the mast assembly actuator
mounting bracket.
B. Remove the screw, washer, bearing, nylon washer, bushing, nylon washer, bearing, washer, flat washer, and nut.
4. To replace the electric actuator, reverse STEPS 1-3.