


SKU 47591 Page 6
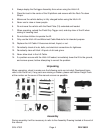
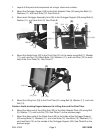
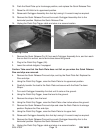
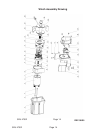
8. Insert the Platform Arms (30) over each end of the Pivot Tube (31). Insert the Quick
Release Pins (2) in each side. See Photo D.
9. Place (and hold) the Deck Plate (19) against the Platform Arms (30) with the Deck
Plate tabs to the right of the Platform Arms. Have someone help you with step.
10. Using Bolts (15), Washers (13), and Lock Nuts (14), secure Deck Plate (19) tabs to
the Platform Arms (30) at four points. Tighten Securely.
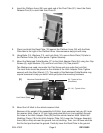
11. Mount the Motorized Cable Module (27) to the Hitch Adapter Plate (34) using four Cap
Screws (6), eight Washers (13), and four Lock Nuts (14). See photo E.
Two Washers are used: one under the Cap Screw and one under the Lock Nut.
The Lock Nuts should be placed on the outside of the Hitch Adapter Plate. Tighten
securely with the Allen Wrench (17). The weight of the Motorized Cable Module may
require someone to help you hold it while you place the mounting hardware.
12. Mount the Lift Hitch to the vehicle receiver hitch.
Because of the weight of the assembled Lift Hitch, have someone help you lift it onto
the receiver hitch. Insert a 1/2 inch high grade steel hitch pin (not supplied) through
the holes in the Hitch Adapter Plate (34) and the vehicle receiver hitch. Attach the
Stabilizer Clamp (18) to the Hitch Adapter Plate (34). Lower the Outrigger Assembly
Arms (28) so they are near the ground, but not touching. Then, turn its lower shaft so
that the foot pad touches the ground. Carefully lower the Deck Plate to the ground.
REV 08/02
[D]
(30)
(30)
(31)
(2)
(2)
(13, 14) - Typical of four
[E]
(6) - Typical of four
(not shown)
Limit Switch Cover
Motorized Cable Module (27)
(34)