


top of the instrument with the ridged side down. It will fit snugly and lock into
place when it is fully inserted.
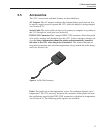
The INFO-CON probe connector includes a memory device that stores the
unique characteristics of the probe, allowing the 1521 to measure tempera
-
ture accurately. If your probe was purchased from Hart for use with the 1521 it
should already have the connector attached and properly programmed. You can
use your own probe with the 1521, but you must attach it with an INFO-CON
connector. See Section 6.6 for more information on the INFO-CON connector.
4.5 Connect the Power Source
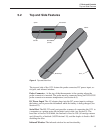
The 1521 draws power from either a DC power supply (the included AC
adapter) connected to the DC input or the internal rechargeable battery pack. To
use the AC adapter, plug it into a wall outlet of the appropriate voltage and in
-
sert the DC plug into the DC power input of the 1521 (see Figure 2.) To use the
battery pack it must first be fully charged using the AC adapter (see Section
6.1).
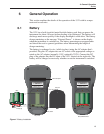
4.6 Switch the Power On
Power is switched on and off with the power button located below and to the
left of the display. To switch the power on, hold the power button down for at
least two seconds. (To switch power off, momentarily press the power button
again.) The instrument takes a few seconds to power up, initialize itself, and be-
gin normal operation. During initialization the lower line of the display shows
the manufacturer, model number, firmware version, and the state of battery
charge or the message “External power” if the AC adapter is attached. The
1521 reads important information about the attached probe from the
INFO-CON connector that it subsequently uses to calculate temperature.
The 1521 then performs a memory check of critical parameters, such as the cal
-
ibration parameters CAL1 and CAL2. During this check the lower line of the
display reads “Checking Memory”. If a “Memory Error” or “Memory Recover”
message is displayed, see Section 12.1, Troubleshooting, for additional infor
-
mation and instructions.
4.7 Measure Temperature
After initialization the upper line of the display will begin to show temperature
measurements sensed at the tip of the probe. Place the tip of the probe into the
object that you want to measure the temperature. DO NOT force the probe or
otherwise allow it to be bent, stressed, or overheated. It can be easily damaged
if misused. For further suggestions on handling the probe and using the 1521
and probe to measure temperature accurately, see Section 6.5. For information
on the various modes of operation of the 1521see Section 7.
1521 Handheld Thermometer Readout
User’s Guide
12