


4 - 22 Maintenance and Repair
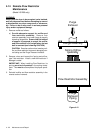
4.14 Remote Flow Restrictor
Maintenance
(Model LS1250 only)
WARNING!
Ensure that the dryer is de-energized, valve isolated,
and fully depressurized before attempting to remove
or disassemble any dryer component or subassem-
bly. Failure to do so may result in serious personal
injury and/or equipment damage.
1. Remove muffler as follows:
a) Provide adequate support for muffler and
flow restrictor assembly. Remove flow
restrictor assembly from lower flange by equally
loosening flange bolts. Ensure that the method
of support is prepared to accept the muffler
and flow restrictor's full weight when the last
bolt is removed (see following CAUTION).
CAUTION: Exercise caution when lowering muf-
fler and flow restrictor to prevent damaging con-
trol tubing and the Purge Pressure Indicator.
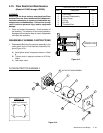
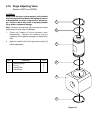
2. Remove, clean and inspect the "spring and orifice-
type" flow restrictor. Install a new flow restrictor if
damage is noted.
IMPORTANT: When installing Flow Restrictor, its
springs must be fully seated in the spring recep-
tacle. This must be accomplished for proper opera-
tion.
3. Reinstall muffler and flow restrictor assembly in the
reverse order of removal.
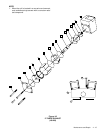
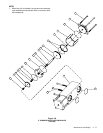
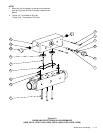
Figure 4.12
Spring Orifice
Assembly
Purge
Exhaust
Piping
Flow Restrictor Assembly
Flange Assembly
Purge
Exhaust