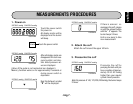
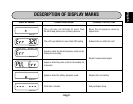
1. Power on
Touch the power switch
for power on.
All display marks will be
displayed and the buzzer
will beep.
After all display marks are
disappeared the last mea-
sured systolic and dias-
tolic blood pressure val-
ues are displayed.
SYSTOLIC mmHg DIASTOLIC mmHg
PULSE/min
POWER Touch the power switch
SYSTOLIC mmHg DIASTOLIC mmHg
PULSE/min
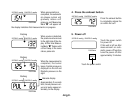
Next the Exhaust symbol
“▼” will be displayed.
SYSTOLIC mmHg DIASTOLIC mmHg
PULSE/min
SYSTOLIC mmHg DIASTOLIC mmHg
PULSE/min
If there is some air re-
maining in the cuff, release
air with the exhaust button
until the “
0
” appears. The
buzzer beeps 3 times.
Unit is now ready to take
new measurement.
(Value of the pulse is not memorized nor displayed.)
Memory function works on for approximately 2 seconds or
during power switch is
depressed.
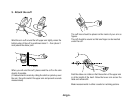
2. Attach the cuff
Attach the cuff around the upper left arm.
MEASUREMENTS PROCEDURES
3. Pressurize the cuff
SYSTOLIC mmHg DIASTOLIC mmHg
PULSE/min
Pressurize the cuff by
pumping the bulb until you
have a reading of approxi-
mately 30 to 40 mmHg
higher than your regular
systolic blood pressure.
Note:
At pressure of 140, 170, 200, 240mmHg, the buzzer beeps
2 times.
English
- Eng 7 -