


5
Monitor Mode GET YOUR RESULTS
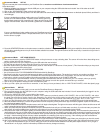
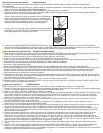
11. After the watering cycle is complete, press the START/STOP button on the plant sensor to stop collecting data. The sensor will make three descend-
ing tones and the yellow light will blink five times.
• Plug the plant sensor into your USB port using the USB cable that was included.
• The PlantSmart website automatically launches and a dialog box opens for you to save your reading.
• Name the location where you had the plant sensor (such as “front window” or “left corner of front planter”.) This information helps you keep track of where
you have placed the plant sensor.
• Select whether the location was INDOORS or OUTDOORS.
• Click the SAVE button.
• You will be taken to the PLANT DOCTOR tab within My Readings.
•
PlantSmartʼs web site examines the data recorded by the plant sensor. The analysis corrects for any weather conditions, and takes into consideration
w
here you live. The website will provide you with easy-to-follow gardening advice to improve the health of your plant. You can also view the sunlight,
t
emperature, moisture, and soil condition information collected by the plant sensor on the PLANTʼS VIEW tab. View other plants that would thrive in this
l
ocation by clicking on the TOP RECOMMENDATIONS andALLRECOMMENDATIONS tabs.
Water Mode SET UP
1. Plug your plant sensor into the USB port on your computer using the USB cable that was included. You will automatically be logged in to the MY
PLANTSMART Dashboard page.
2. Click on the “WATER” button at the far right of the screen to set your plant sensor to Water mode. Water mode quickly determines if your plants need
immediate watering or not. NOTE: Water mode does not work for cacti or orchids.
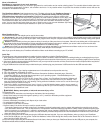
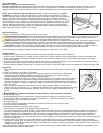
3. When instructed, remove the sensor from the USB port and put the plant sensor together (top and bottom).
4. Press the START/STOP button on the sensor to begin Water mode. HOLD THE SENSOR BY THE TOP. The sensor light will blink green and the
sensor will emit three ascending tones to let you know that it is in Water mode. The light will stay green while it is on.
5. Insert the soil sensor fully in the soil near the roots of the plant whose moisture level you wish to check.
6. If a plant needs water, the sensor light will blink yellow and will make a chirping sound. Water the plant well if you hear this sound. If the sensor light
stays green, then that plant does not need water.
7. You can then move on to another plant by lifting the plant sensor out of the soil, and placing it in the soil near a different plant.
8. Continue to move the plant sensor from plant to plant to determine if they need watering.
9. When done checking plants that might need watering, press the START/STOP button. There is no need to press the START/STOP button for every
plant.
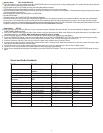
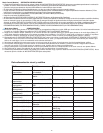
Mode Event Visual Audio
Connected to Computer Companion Software not
installed
Solid yellow Up tone
Inserting Battery Closing battery door No light Ba-beep
Connected to Computer Sensor attached to USB Blink Green Up tone
Disconnecting from
Computer
Sensor detached from
USB
No light Down tone
Recommend Mode Press start button Blink Green Up tone
Recommend Mode Press stop button Blink Yellow Down tone
Recommend Mode Taking a reading Blink green once every 5 sec No sound
Monitor Mode Press start button Blink Green Up tone
Monitor Mode Press stop button Blink Yellow Down tone
Visual and Audio Feedback
Monitor Mode Taking a reading Blink green once every 5 sec No sound
Monitor Mode Needs watering Blink yellow Siren
Monitor Mode Too much water Blink yellow Warning
Water Mode Needs watering Blink yellow Siren
Water Mode Doesn't need watering Blink green No sound