


17
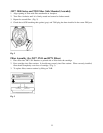
Positive Pressure Seal Check
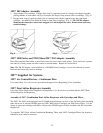
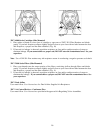
1. Remove breathing tube, Powerflow™ PAPR assembly or cartridge/canister from the center DIN port, as
applicable.
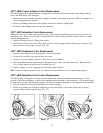
2. With the palm of your hand covering the exhalation valve cover and center DIN port, exhale gently. If
facepiece bulges slightly and no air leaks are detected between your face and the facepiece, a proper seal
has been obtained (Fig. 9).
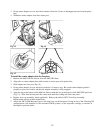
3. If faceseal air leakage is detected, reposition respirator on face and/or readjust tension of straps to
eliminate air leakage If you cannot achieve a proper seal, DO NOT enter the contaminated area. See
your supervisor.
FIT TESTING
Note: Fit testing is a U.S. Occupational Safety and Health Administration (OSHA) and Canadian CSA Z94.4
standard requirement. Therefore, either quantitative or qualitative fit testing must be conducted prior to the
respirator being issued. (Quantitative Fit Testing [QNFT] can be conducted using a 3M™ 601 Fit Test
Adapter and 42 CFR 84 P100 filters such as the 3M™ 2091 or 7093 Particulate Filters.)
Qualitative Fit Testing (QLFT) with the 3M™ FT-10 or FT-30 Qualitative Fit Test Apparatus can be
conducted using any of the NIOSH approved 42 CFR 84 particulate filters. Use of Qualitative Fit Testing
may reduce the respirator’s Assigned Protection Factor (APF). Reference U.S. OSHA 29 CFR 1910.134.
Note: For further information concerning fit testing contact 3M OH&ESD Technical Service
INSPECTION, CLEANING, AND STORAGE
The 3M™ 6000 Series Respirator must be inspected before each use to ensure that it is in good operating
condition. The facepiece should be repaired or replaced upon observation of damaged or defective parts. The
following inspection procedure is suggested.
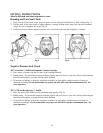
1. Check facepiece for cracks, tears and dirt. Be certain facepiece, especially faceseal area, is not distorted.
2. Examine inhalation valves for signs of distortion, cracking or tearing.
3. Make sure that head straps are intact and have good elasticity.
4. Examine all plastic parts for signs of cracking or fatiguing. Make sure filter gaskets are properly seated
and in good condition.
5. Remove exhalation valve cover and examine exhalation valve and valve seat for signs of dirt, distortion,
cracking or tearing. Replace exhalation valve cover.
6. Inspect lens for any damage that may impair respirator performance or vision.