30
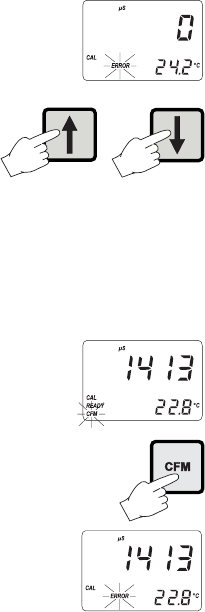
If the zero calibration cannot be performed,
"ERROR" will blink.
Cell constant calibration
• Select the solution value on the
primary display by pressing
or if the selected range has
two possibilities (e.g. 5.000 and
12.880 mS).
• Immerse the EC/TDS probe with the temperature sensor in
the selected solution. The level of solution must be higher
than the holes of the EC/TDS probe sleeve. Tap the EC/
TDS probe repeatedly on the bottom of the beaker and stir
to ensure that no air bubbles are trapped inside the sleeve.
• When the reading is stable, "CAL"
will stop flashing (after about 30 sec-
onds) and the "READY" and "CFM"
indicators will blink.
• Press CFM to confirm the calibra-
tion point; if the reading is close to
the selected solution, the meter
stores the reading.
If the reading is not close to the se-
lected solution, "ERROR" will blink.
Note A 2-point calibration is always suggested. However the EC/
TDS calibration can also be performed at 1 point. To cali-
brate offset only, just press CAL after confirmation (with CFM)
of the zero reading; the meter will return to normal opera-
tional mode. To have the cell constant calibrated first, press
the up or down arrow keys after entering the calibration pro-
cedure to skip to the next possible calibration buffer. In this
case, after confirmation of the cell constant, the meter will
ask for the offset calibration displaying zero on the LCD; press
CAL to exit or calibrate the offset, if desired.
Note The EC or TDS calibration value shown is referenced at 25°C
even if the reference temperature of 20°C has been selected.
Note During calibration, press LCD to display the cell constant
value on the primary display. Press LCD again to return to
calibration buffer visualization.


