5-11
IPI 100 and IPI 200 Series • HelpDesk Software
6. Press and hold the intercom button. It turns to a high amber color and the Mic
On LED lights green. On the PC monitor, the Listen button is activated, the
“IncomingCallAlert”indicatorashes,andtwoaudiblesignalsofdifferent
frequencies are heard at the intercom.
7.
Release the intercom button. It turns to a low amber color and the Mic On LED
turns off.
Group announcement
1. Decide which IP devices on the Active Intercom List you wish to group
together.SelecteachdeviceoneatatimeandusetheGroupdrop‑downmenu
to assign all of them to the same group.
N
Each device on the Active
Intercom List can only
belong to one group.
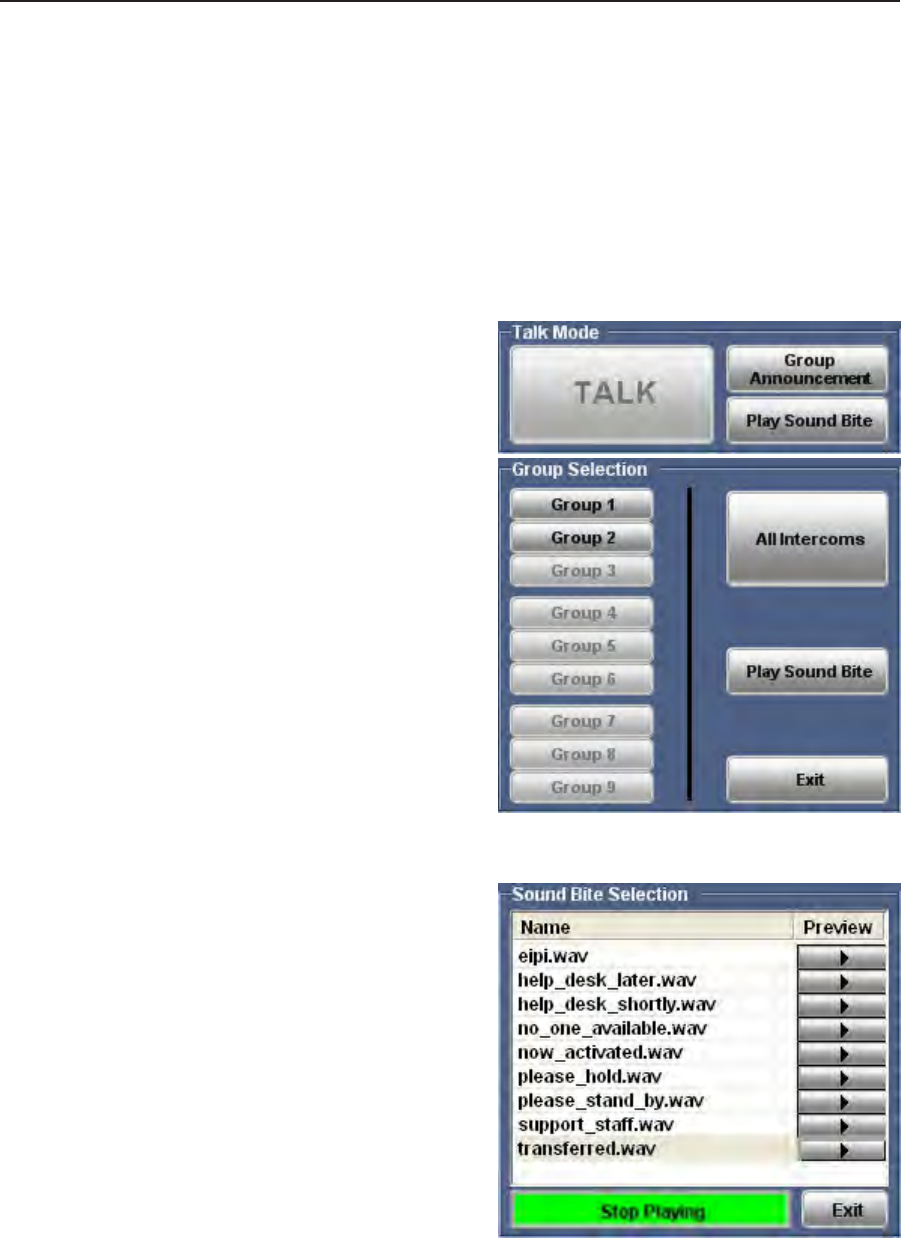
2.
Click the Group
Announcement button.
3.
TheGroupSelectionpane
becomes visible. Groups
that are available are listed
in black text; groups that are
not available are grayed out.
SelectanavailablegrouporAll
Intercoms.
4.
The selected button turns
green and the intercom
devices belonging to that
group are highlighted in the
Active Intercom List.
5.
Activate the Talk mode (see
step 2 of Talk Mode on page
5‑9).Whenyouhavenished
talking inactivate the Talk
mode (see step 4ofTalkModeonpage5‑9).
or
Click the Play Sound Bite. A
list of available sound bites
appears. (For information
aboutmanagingtheSound
Biteslist,seeLoading a
pre‑recorded.wavleon
page5‑12)Selectthesound
bite and click on the Play to
Intercom(s) button. The
button turns green and
the text is changed to Stop
Playing.
6.
Whenthesoundbitehas
finished playing, click on the
Exit button.
7.
ClosetheGroupSelectionpanebyclickingontheExit button.


