


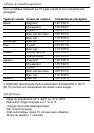

7. Press “Enter” to select the displayed meat type. The LCD screen
returns to the current temperature display. The name of the selected
meat appears above the temperature reading.
8. To test the internal temperature of the food, unfold the metal probe
and insert it into the thickest part of the food. Do not come in contact
with bone, fat or gristle, as these areas will not provide accurate tem-
perature readings. Take care when moving the probe into position to
avoid injury or damage. DO NOT LEAVE THE THERMOMETER IN
THE OVEN WHILE COOKING, AND DO NOT TOUCH THE HOT
PROBE WITH BARE HANDS.
9. The current internal temperature of the food appears on the LCD
screen.
10. Color coded lights behind the Taylor® logo indicate if the current
temperature is lower, higher, or within 5 degrees of the target temper-
ature.
• If the temperature is lower than the target temperature, a blue LED
light flashes.
• When the temperature reaches the target temperature, a green LED
light flashes.
• If the temperature is higher than the target temperature, a red LED
light flashes.
(Note: the temperature must be within 30 degrees of the target tempera-
ture for the LED lights to activate. Thus, the blue light may not flash,
even if the current temperature is lower than the target temperature.
The current temperature will still appear on the screen.)
11. When the food is ready, remove it from the oven with a heat resist-
ant glove. DO NOT TOUCH THE HOT PROBE OR FOOD WITH
YOUR BARE HANDS!
12. The LCD screen has a convenient backlight feature for easy temper-
ature viewing. While the unit is on, press the “°F/°C” button to turn on
the backlight for 10 seconds.
13. Press and hold the “Enter” button for 3 seconds to turn the unit off.
Otherwise, the unit will turn off automatically after 10 minutes if no
buttons are pressed and there is no change in temperature.
Note: when the thermometer turns off, its memory will return to the