


930398 Rev. B
X. Set-Up & Adjustment
33
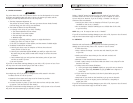
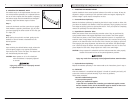
4. Reinstall the Rear Quick-Release Clamps
a. Working from the inside of the chair, insert the
threaded portion of the clamp through the
anodized frame component and the appropriate
adjustment hole in the rear upright
of the frame.
b. Push the clamp through until it rests against
the anodized frame component. Be sure that the
clamp’s square portion engages the square open-
ing in the spacer & washer. Improper alignment
may cause the clamp to extend from the frame
somewhat, causing improper clamping.
CAUTION– An unexpected loosening of the clamp
may result.
c. With one hand on the lever, install the locknut
onto the threaded end of the clamp with your
other hand. Work the lever up and down as you
tighten the locknut, until you feel sufficient ten-
sion to clamp it firmly into place. The black safe-
ty lock button will engage and click into place.
If the lever will not close, or will do so only with
excessive pressure, loosen the locknut slightly
until the clamp can be locked into place with
relative ease. Listen for the click to be sure that
the safety lock is secure.
d. Test the clamp by pulling up on the release lever
without engaging the black safety lock button.
The clamp lever should not release. Repeat
this procedure for the other clamp.
CAUTION– Never operate this wheelchair with the
clamp assemblies partially or improperly
secured.
X. Set-Up & Adjustment
930398 Rev. B
32
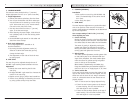
3. Turning Anti-Tip Tubes Up
Turn anti-tip tubes up when being pushed by
attendant, overcoming obstacles or climbing curbs.
a. Press the rear anti-tip tube release lever.
b. Hold lever in and turn anti-tip tube up.
c. Release lever.
d. Repeat with second anti-tip tube.
e. Remember to return anti-tip tubes to down
position after completing maneuver.
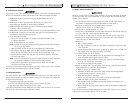
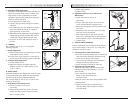
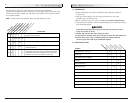
J. ADJUSTING THE “SQUEEZE”
The term “squeeze” refers to the position of the pivoting
seat frame relative to four factory preset positions on the
rear frame uprights. The squeeze is adjusted by raising or
lowering the seat frame to one of the four positions (ref-
erenced as 1-4 from top to bottom). Changing the
amount of seat squeeze not only adjusts the comfort
level of the user, but also raises or lowers the center of
gravity-thereby affecting the chair’s relative performance.
Consult your therapist and dealer to determine the
squeeze and seating position that’s best for you.
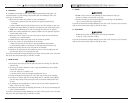
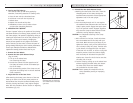
1. Remove the Rear Wheels
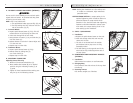
2. Remove the Rear Quick-Release Clamps
(Figs. A and B)
a. Lift up on the release lever,
thus loosening the clamp.
b. Unscrew the locknut from the opposite end of
the clamp and remove it from the threaded por-
tion of the clamp.
c. Pull the remaining portion of the clamp out and
away from the locating hole in the rear anodized
frame component.
3. Adjust the Rear of the Seat Frame
After removing the clamps, move the rear of the seat
frame up or down to one of four preset positions as
desired. Note that since the backrest assembly moves
with the pivoting seat frame, it may require readjust-
ment after this procedure. See the section on Adjusting
the Backrest (pg. 34).
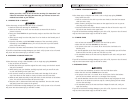
Figure A
Figure C
Figure B
*The clamp shown in the drawings
above should remain on the inside
of the chair.