


930398 Rev. B
X. Set-Up & Adjustment
29
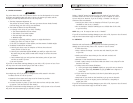
E. CUSHION (OPTIONAL)
Installation
1. Place cushion on seat sling with VELCRO® side
down. The beveled edge of the cushion should
be in front.
2. Press firmly into place.
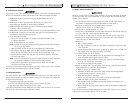
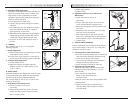
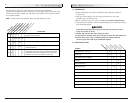
F. REAR AXLES
The most important adjustment on your Quickie wheel-
chair is the position of the rear axle. The center of
gravity, wheel camber and wheelbase are all determined
by the axle adjustment.
Use a torque setting of 100 in.-lbs. (11.3 N.m)
when adjusting rear axle.
1. Center of Gravity
Moving the center of gravity to the front will lighten
the force required to turn the chair. The further back
the camber tube, the more stable the chair becomes.
The center of gravity is adjusted by moving the
camber tube forward or backward on the frame.
Moving the camber tube forward will increase your
turning speed and lighten the front end.
2. Wheel Camber
The wheel camber adjustment provides greater side-
to-side stability due to the increased width and
angle of the wheelbase. The wheel camber adjust-
ment also allows for quicker turning and greater
access to the top of the handrims.
Wheel camber is determined by the camber plug.
Plugs are available from your authorized supplier in
dual 0°,12° & 3°,12° or single plugs at 4°, 8°, &16°.
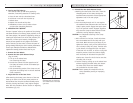
3. Toe-In and Toe-Out
Toe-in and Toe-out terms are terms that relate to how
well the rear wheels of the chair are aligned. This will
affect how well the chair will roll. Drag or resistance
occurs in a wheelchair when the rear wheels are not
properly aligned.
Toe-in or Toe-out can be slightly adjusted for by:
a. If chair has toe-in move spacers to the bottom
of caster housing. This will raise the front of
chair and adjust for toe-in problem.
b. If chair has toe-out move spacers to the top of
caster housing. This will lower the front of the
chair and adjust for a toe-out problem.
X. Set-Up & Adjustment
930398 Rev. B
28
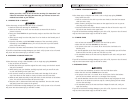
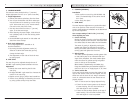
C. FOLDING BACKREST
The backrest comes standard with a 4" (100 mm)
height adjustment from 10" to 14" (250 to 355 mm).
1. Height Adjustment
a. Remove the backrest upholstery from the frame.
b. You will see the backrest tube which telescopes
into the frame and is secured by a screw. Using a
5/32" allen wrench and a 7/16" wrench remove
the screw on the side of the frame.
c. You may choose from four holes, 1" (25 mm)
apart, to set the back height.
d. After selecting the proper height, slide the back-
rest upholstery back on with the overlap portion
unattached.
e. Secure VELCRO®-style material on side tubes and
attach the excess overlap.
2. Back Angle Adjustment
An 8º angle adjustment is standard on all
Quickie wheelchairs.
a. By moving the back adjustment washer (A)
ahead of or behind the frame tube you may
change the back angle.
b. The adjustment on each side of the chair must
be exactly equal.
D. SEAT SLING
The seat sling can be adjusted through the use of
VELCRO® -style retaining material beneath the seat.
Adjustment
1. Remove the screws retaining the left side
seat sling.
2. Re-adjust VELCRO® -style material to increase the
tension in the seat sling.
3. Replace screws using a phillips head screwdriver.
4. If there is any difficulty in reattaching the screws,
try using a probe to help line up the holes.
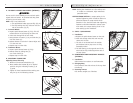
7/16" nuts
A
B
Toe in
Toe out