


930469 Rev. A
VI. Warnings: Falls & Tip-Overs
17
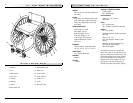
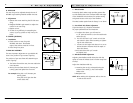
H. TRANSFER
It is dangerous to transfer on your own. It requires good balance and agility. Be aware
that there is a point during every transfer when the wheelchair seat is not below you.
To Avoid A Fall:
1. Work with your health care advisor to learn safe methods.
a. Learn how to position your body and how to support yourself during
a transfer.
b. Have someone help you until you know how to do a safe transfer on your own.
2. Lock the rear wheels before you transfer. This keeps the rear wheels from rolling.
NOTE– This will NOT keep your chair from sliding away from you or tipping.
3. Make sure to keep pneumatic tires properly inflated. Low tire pressure may allow
the rear wheel locks to slip.
4. Move your chair as close as you can to the seat you are transferring to.
If possible, use a transfer board.
5. Rotate the front casters until they are as far forward as possible.
6. If you can, remove or swing footrests out of the way.
a. Make sure your feet do not catch in the space between the footrests.
b. Avoid putting weight on the footrests as this may cause the chair to tip.
7. Make sure armrests are out of the way and do not interfere.
8. Transfer as far back onto the seat surface as you can. This will reduce the risk
that the chair will tip or move away from you.
If you fail to heed these warnings damage to your chair, a fall, tip-over or loss of con-
trol may occur and cause severe injury to the rider or others.
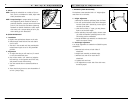
I. CURBS & STEPS
1. Each person who helps you should read and follow the warnings
“For Safe Use” (Section VII).
2. Do not try to climb or descend a curb or step alone UNLESS you
are a skilled rider of this chair and:
a. You can safely do a “wheelie”; and
b. You are sure you have the strength and balance to do so.
3. Unlock and rotate anti-tip tubes up, out of the way, so they do not interfere.
4. Do not try to climb a high curb or step (more than 4 inches high) UNLESS you
have help. Doing so may cause your chair to exceed its balance point and tip over.
5. Go straight up and straight down a curb or step. If you climb or descend at an
angle, a fall or tip-over is likely.
6. Be aware that the impact of dropping down from a curb or step can damage your
chair or loosen fasteners.
If you fail to heed these warnings damage to your chair, a fall, tip-over or loss of con-
trol may occur and cause severe injury to the rider or others.
VI. Warnings: Falls & Tip-Overs
930469 Rev. A
16
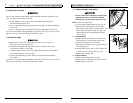
G. RAMPS, SLOPES & SIDE HILLS
Riding on a slope, which includes a ramp or side hill, will change the center of
balance of your chair. Your chair is less stable when it is at an angle. Anti-tip tubes
may not prevent a fall or tip-over.
1. Do not use your chair on a slope steeper than 10%. (A 10% slope means: one
foot in elevation for every ten feet of slope length.)
2. Always go as straight up and as straight down as you can. (Do not “cut the cor-
ner” on a slope or ramp.)
3. Do not turn or change direction on a slope.
4. Always stay in the CENTER of the ramp. Make sure ramp is wide enough that you
are not at risk that a wheel may fall over the edge.
5. Do not stop on a steep slope. If you stop, you may lose control of your chair.
6. NEVER use rear wheel locks to try to slow or stop your chair.
This is likely to cause your chair to veer out of control.
7. Beware Of:
a. Wet or slippery surfaces.
b. A change in grade on a slope (or a lip, bump or depression). These may cause
a fall or tip-over.
c. A drop-off at the bottom of a slope. A drop-off of as small as 3/4 inch can
stop a front caster and cause the chair to tip forward.
8. To Reduce The Risk Of A Fall Or Tip-Over:
a. Lean or press your body UPHILL. This will help adjust for the change in the
center of balance caused by the slope or side hill.
b. Keep pressure on the handrims to control your speed on a down slope.
If you go too fast you may lose control.
c. Ask for help any time you are in doubt.
9. Ramps At Home & Work - For your safety, ramps at home and work must meet all
legal requirements for your area. We recommend:
a. Width. At least four feet wide.
b. Guardrails. To reduce the risk of a fall, sides of ramp must have guardrails (or
raised borders at least three inches high).
c. Slope. Not more than a 10% grade.
d. Surface. Flat and even, with a thin carpet or other non-skid material.
(Make sure there is no lip, bump or depression.)
e. Bracing. Ramp must be STURDY. You may need bracing so ramp does not
“bow” when you ride on it.
f. Avoid A Drop Off. You may need a section at the top or bottom to smooth out
the transition.
If you fail to heed these warnings damage to your chair, a fall, tip-over or loss of con-
trol may occur and cause severe injury to the rider or others.