


14 Single-Speed/Ramp-Hold
Problem: Controller display
turns on. No heat in kiln.
■
Is the relay making its normal clicking sound?
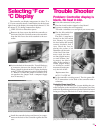
Test the elements with an ohmmeter:
Element Resistance Test
UNPLUG kiln/disconnect the power. Open the
kiln’s switch box. Make sure the wires connecting
the relay to the elements are secure. If connec
-
tions are okay, continue to step 2:
Touch theohmmeter leadsto thetwo elementcon
-
nectors of each element. A no-needle-movement
reading on an analog meter, or OPEN on a digital
meter, indicates a broken element.
If the elements check out okay, replace the relay.
Note: To replace relay, see your kiln’s instruction and
service manual.
We knowthe controlleris receivingvoltage, becausethe
display is lit. But the voltage from the transformer may be
too lowto powerthe relays. Performthe “ControllerPower
Input Test,” page 13. If your controller passes the Input
Test, perform the “Controller Power Output Test”:
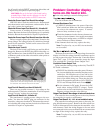
Controller Power Output Test
Is thecontrollersending voltageto therelay? TestOUT-
PUT with a voltmeter:
UNPLUG the kiln/disconnect the power. Remove
the 4 screws holding thecontroller faceplate tothe
switch box. Lift faceplate out of box and let the
controller hang on the outside of the box with the
back of the board facing you. Then plug the kiln
back in. Program thecontroller to fire to 1000°F at
FULL rate in Ramp-Hold mode. Press .
Put the voltmeter in DC mode. (It must be in DC
mode when testing OUTPUT voltage.) Touch
probes to the red wire and black wire connections.
Measure voltage when the relay clicks on.
Output Test Result: No voltage at red and black wires
The controller is not sending power to the relay. Return
the controller for repair or replacement.
Output Test Result: 10 - 14 v. at red and black wires
The controller issending correct power to therelay. Un
-
plug kiln/disconnect power. Remove the kiln switch box.
Look for disconnected wires between the controller, relay
and elements. Check the wiring diagram to be sure wires
are connectedto thecorrect terminals.Be sureconnections
are tight. If the wiring is okay, replace the relay.
Note: To replace relay, see your kiln’s instruction and
service manual.
(in AC mode) to both INPUT connections (the white and
orange wires). (See photo on previous page.)
CAUTION: Do not let the back of the board touch a
grounded object. Make sure the voltmeter is in the AC
modewhen placingthe probeson INPUTconnections.
Controller Power Input Test Result: No voltage
UNPLUG kiln. Check the switch box for disconnected
wires between the cord, transformer, and controller. If wir
-
ing is okay, replace the transformer.
Controller Power Input Test Result: 20 - 24 volts AC
Correct current is reaching the board from the trans
-
former. But since the board is not lighting up, it is probably
defective.Returnthe controllerfor repairor replacement.
Controller Power Input Test Result: less than 20 volts
Did you recently replace the transformer? It may be the
wrong voltage.The voltageis below 20,which is notenough
power for the controller. To find out the cause of low volt
-
age, continue below:
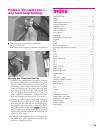
Controller Input Test #2
The back of the board is still facing you and the kiln is
pluggedin. Removethe INPUTplug,which isthe white,or
-
ange,and bluewires, fromtheback ofthe controller.Touch
a voltmeter probe to the white wire and the other probe to
the orange wire.
Input Test #2 Result: Less than 20 Volts AC
There are two possible reasons: 1) Low voltage at the
wall receptacle; 2) defective transformer. If wall receptacle
voltage is correct, replace the transformer.
Input Test #2 Result: 20 - 24 Volts AC
The transformer is sending correct voltage to the con
-
troller. Yet when the INPUT plug was connected to the
controller,voltage wasless than20. This meansthe control
-
ler is draining the voltage and may bedefective. Return the
controller for repair or replacement.
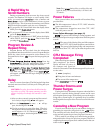
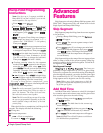
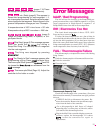
Input Test #2 with disconnected plug: Touch the voltmeter
probes to the white and orange wires to test voltage going to
the controller. The voltmeter must be in AC mode.