


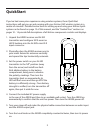
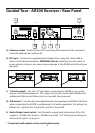


6. Make the physical cable connection between the AR300 output jack and an audio
input of your amplifier or mixer. Leave your amplifier or mixer off at this time.
7. Turn the Level knob on the AR300 completely counterclockwise, then slide its
Power switch in the direction of the arrow to turn it on. The LCD display light will
illuminate.
8. Now to set the channel, press and hold the EDIT control until the display reads CH
SCAN. Next, the AR300 will automatically find the clearest channel and you will see
it in the Channel number of the display just before the IR SET will begin.
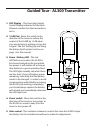
9. Once you see the IR SET flashing in the LCD display, hold the transmitter, with
the IR window facing towards the AR300, approximately 6 inches away from the
receiver and turn the AL300 power switch on. The AR300 will transmit the channel
number to AL300 over infrared light and you will see the corresponding absolute
channel number in the transmitter LCD.
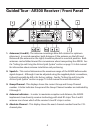
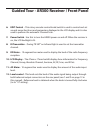
10. The RF Meter on the AR300 receiver should now be active, indicating that it is
receiving valid RF signal and is placed and positioned correctly.
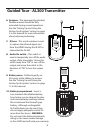
11. Now it’s time to set the audio levels. Turn on your mixer and/or amplifier but
keep its volume all the way down. Plug in the included Samson SE10 or LM10
microphone into the AL300. Begin speaking at a normal performance level while
observing the AR300 AF Meter. If all the bars are lit, indicating a Peak condition,
even with the AR300 Level control fully counterclockwise, engage the 15 dB pad on
your transmitter by sliding the switch in the direction of the arrow. If the AF Meter
bars are showing a weak level, slowly turn the AL300’s Gain control clockwise to the
point where the AF Meter reaches ‘‘0” during the very loudest passages, then back
it off just slightly; this will ensure maximum signal to noise ratio. Now, raise the
Level on the AR300. Finally, raise the level of your mixer and/or amplifier until the
desired volume is reached.
Setting Up and Using Your AirLine Synth system
10