


ENGLISH
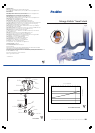
Check that you have connected the
mask elbow correctly by rotating it. Be
careful not to squeeze the sides of the
elbow. If the mask elbow is fitted
correctly, it should rotate freely and not
separate from the mask frame.
9 Adjust the angle of the mask by selecting
the setting that provides a comfortable
fit with minimum or no leak.
To test each setting, hold down the
Angle Selector Tab (Fig. C-6) and move
the headgear clip up or down
(Fig. C-6a) as required. You may need
to raise the headgear clip when moving
it from one setting to the next.
The mask can be tilted at five different
positions. If you feel excessive pressure
on the middle of the nose, tilt the mask
down. Alternatively, if you feel excessive
pressure on your upper lip, tilt the mask
up.
10 If you feel air leaks around the cushion,
reposition the mask on your face to
achieve a better seal.
Take time to adjust all straps and the
position of the mask so that you can
achieve a secure and comfortable fit.
Notes:
• If you are unable to resolve any leaks you
may need to try another cushion size.
• Excess headgear length may be trimmed
to a suitable length if required. Leave at
least 30 mm free length on the straps.
• Select "Standard" as the mask option
when using the M
IRAGE KIDSTA with
ResMed flow generators that have mask
setting options.
REMOVING THE MASK
To remove the MIRAGE KIDSTA, squeeze
one of the headgear clips. This releases one
side of the headgear from the mask. Pull the
mask and headgear away from your head.
Notes:
• Do not pull the headgear off your head
without releasing the headgear clips first.
• You can detach the elbow from the mask
frame while wearing the mask. This is
useful when therapy needs to be stopped
for a short time; for example if you need to
go to the bathroom.
• Check that you can remove the headgear
clip, the quick release swivel or the
headgear unaided.
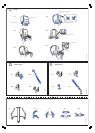
DISASSEMBLING FOR CLEANING
See Figure D.
1 Detach the mask elbow. To do this,
squeeze the sides of the mask elbow at
the finger grips while pulling it away from
the mask frame (Fig. D-1).
2 Disconnect and separate the main air
tubing, short air tubing, mask elbow and
vent cover (Fig. D-2).
Notes:
• To prevent damage to the short air
tubing, disconnect it by holding it at the
cuff.
• The swivel does not need to be
disconnected from the short air tubing.
3 Detach the headgear from the mask
frame by squeezing and releasing both
headgear clips.
4 Remove the ports cap from the mask
frame (Fig. D-3).
5 Firmly pull the mask cushion away from
the mask frame (Fig. D-4).
61809r2 Eng.fm Page 3 Friday, August 6, 2004 3:20 PM