


ENGLISH
• At low CPAP pressures, the flow
through the exhaust vent may be
inadequate to clear all exhaled gas from
the tubing. Some rebreathing may occur.
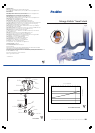
Explanation of the Warning: The
exhaust vent flow is lower at lower mask
pressures (see Pressure/Flow curve—
Figure A). To avoid rebreathing it is
recommended that a mask pressure of
4cmH
2
O or more be used.
• The MIRAGE KIDSTA features an elbow
that can be easily removed while the
mask is fitted. The mask should not be
used with the elbow attached unless the
flow generator is turned on and
operating properly.
• If oxygen is used with the flow
generator, the oxygen flow must be
turned off when the flow generator is
not operating.
Explanation of the Warning: When the
flow generator is not in operation, and
the oxygen flow is left on, oxygen
delivered into the ventilator tubing may
accumulate within the flow generator
enclosure. Oxygen accumulated in the
flow generator will create a risk of fire.
This warning applies to most types of
flow generators.
• Please refrain from smoking while
oxygen is in use.
Note: At a fixed rate of supplemental
oxygen flow, the inhaled oxygen
concentration will vary, depending on the
pressure settings, patient breathing pattern,
mask selection and leak rate.
PARTS OF THE MASK
See Figure B.
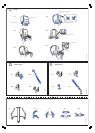
FITTING THE MASK
See Figure C.
Note: Before fitting the mask, refer to the
section “Cleaning the Mask in the Home”.
1 Place the headgear on the head. Adjust
the side vertical straps so that the lower
strap sits just below the ear (not
touching it) and at the base of the head
(Fig. C-1).
2 The headgear clip should be parallel
with the nose and not in the line of
vision. Check that the crossover is as far
forward as possible (Fig. C-2).
To adjust the crossover to a forward
position, slide the crossover buckle
along one strap (Fig. C-2a) and then
along the other strap (Fig. C-2b).
Alternate the movement on each side
until the crossover is as far forward as
possible.
3 Ensure that the crossover and the rear
straps lie flat against the head.
4 Place the mask on the nose (Fig. C-3).
Clip the mask to the headgear.
5 Adjust the lower straps by pulling firmly
(Fig. C-4) so that the rear straps fit
securely around the base of the head
(Fig. C-4a).
Note: Ensure that the nostrils are not
blocked by the cushion.
6 Connect one end of the main air tubing
to your flow generator and the other
end to the swivel.
Note: The swivel, short air tubing and
mask elbow are supplied assembled.
7 Turn your flow generator on.
8 Connect the mask elbow to the mask
frame. To do this, hold the sides of the
mask elbow (Fig. C-5) and firmly push
the elbow onto the mask frame until it
clicks into place.
61809r2 Eng.fm Page 2 Friday, August 6, 2004 3:20 PM