


24 Dynamo
TILLER ANGLE ADJUSTMENT
WARNING! Remove the key before adjusting the tiller. Never attempt to adjust the tiller
while the scooter is in motion.
You can adjust the tiller to any number of positions between the forward stop and the scooter deck. The
tiller lock lever keeps the tiller in position.
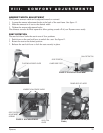
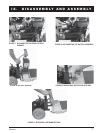
1. To loosen, turn the tiller adjustment lever counterclockwise. See figure 11.
2. Move the tiller to a comfortable position.
3. To tighten, turn the tiller adjustment lever clockwise. The tiller will remain in the position you've
selected.
NOTE: In order to lower the tiller to the scooter deck, you must first remove the seat and both batteries.
See IX. Disassembly and Assembly.
SEAT HEIGHT ADJUSTMENT
The seat can be repositioned to one of three different heights.
1. Remove the seat and shroud from your Dynamo. See IX. Disassembly and Assembly.
2. Use the attached ring to pull and remove the ball detent pin from the lower seat post. See figure 12.
3. Raise or lower the seat pedestal to the desired seat height.
4. While holding the seat pedestal at that height, match up the holes in the seat pedestal and in the lower
seat post.
5. Fully insert the ball detent pin.
6. Reinstall the seat.
POWER SEAT (OPTIONAL)
Your Dynamo may be equipped with a power seat actuator. The actuator raises and lowers the seat
automatically. See figure 14.
WARNING! The power seat actuator is intended for operation only while the vehicle is
stationary and on a level surface. Its purpose is to aid you in reaching objects. Strict
adherence to the following safety rules is vital to your safety:
Do not attempt to raise or lower the seat while in motion! Do not operate your scooter
with the power seat elevated. It is recommended that the vehicle be driven only with the
seat in the lowest position.
FRONT-TO-BACK SEAT ADJUSTMENT
You can change the Dynamo front-to-back seat position.
1. Remove the seat.
2. Use a 7/16-in. wrench to remove the seat position adjustment screws. See figure 13.
3. Reposition the seat base on the seat and reinstall the seat position adjustment screws.
4. Reinstall the seat.
VIII. COMFORT ADJUSTMENTS