


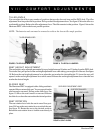

17Hurricane PMV
How can I get maximum range or distance per charge?
Rarely will you have ideal driving conditions; smooth, flat, hard driving surfaces with no wind or curves. You will
often face hills, sidewalk cracks, uneven and loosely packed surfaces, curves, and wind. All of these driving
conditions affect the distance or running time per battery charge. The following are a few suggestions for obtaining
the maximum range per battery charge.
! Always fully charge your Hurricane PMV’s batteries prior to your daily use.
! Maintain 30 psi (pounds per square inch) in all of your Hurricane PMV’s tires.
! Plan your route ahead to avoid as many hills, cracked, broken, or soft surfaces as possible.
! Limit your baggage weight to essential items.
! Try to maintain an even speed while your Hurricane PMV is in motion.
! Avoid stop-and-go driving.
What type and size of battery should I use?
We recommend deep-cycle batteries that are sealed and maintenance free. Both Sealed Lead-Acid (SLA) and
Gel Cell are deep-cycle batteries that offer similar performance in your Hurricane PMV. Do not use wet-cell
batteries, which have removable caps.
NOTE: Do not remove the caps from sealed batteries. Water cannot be added to sealed batteries. Cap
removal voids the battery warranty and may cause damage to the batteries and to your Hurricane PMV.
Use these specifications to reorder deep-cycle batteries:
Type: Deep-cycle (sealed lead-acid or gel cell)
Size: U-1
Voltage: 12 volts each
Amperage: 32 AH (amp hours) or 40 AH (amp hours)
To change a battery in your Hurricane PMV:
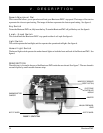
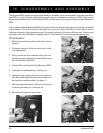
1. Remove the seat and the rear shroud. See IX. “Disassembly and Assembly.”
2. Disconnect the battery tie-down strap.
3. Disconnect the battery cables from the electronic controller module.
4. Disconnect the battery cables from the battery terminals.
5. Remove the old battery.
6. Place a new battery in the battery well.
7. Connect the red battery cable to the positive (+) battery terminal.
8. Connect the black battery cable to the negative (-) battery terminal.
9. Reconnect the battery cables to the electronic controller module.
10. Reconnect the battery tie-down strap.
11. Reinstall the rear shroud and the seat.
V I. BATTERIES AND CHARGING
WARNING! Battery posts, terminals and related accessories contain lead and lead com-
pounds. Wash hands after handling.