


15
AUS Pride LX Series/RevC/Apr03
III. ASSEMBLY
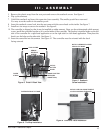
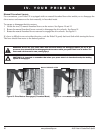
Figure 9. Controller Label Installation
INSTALL LABEL ON OPPOSITE SIDE OF
JOYSTICK/CONTROLLER BRACKET.
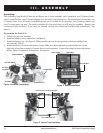
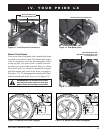
5. Remove the plastic wrap from the seat posts and remove the seatback screws. See figure 6.
6. Flip up the armrests.
7. Unfold the seatback and insert the canes into base assembly. The smaller pouch faces rearward.
You may store the toolkit in the smaller pouch.
8. Insert the seatback screws back into the seat canes with the screw head on the inside. See figure 7.
9. Install two tie-wraps to secure the seatback. See figure 8.
10. The controller is shipped so that it may be installed on either armrest. Once you have determined which armrest
to use, install the controller bracket so it is on the inside of the controller. The bracket is installed either on the left
side of the controller for a right-hand application or on the right side for a left-hand application. Then place the
decal over the holes on the other side. See figure 9.
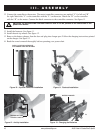
11. Insert the controller into the armrest. See figure 10. The controller must be oriented with the decal
facing outward.
Figure 7. Seatback
Screw Installation
INSTALL SCREWS WITH SCREW
HEAD ON THE INSIDE.
Figure 8. Tie-Wrap Installation
FASTEN SEATBACK TO FRAME.
FOLD UP ARMS.
Figure 6. Pride LX Back View
REMOVE
SEATBACK
SCREWS.
INSTALL
BATTERY
BOXES.
CONNECT BATTERY
BOXES (RED
CONNECTORS).
FASTEN
STRAPS.