


Jazzy 1103 Rev L/Feb03 www.pridemobility.com 23
V. COMFORT ADJUSTMENTS
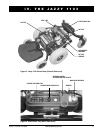
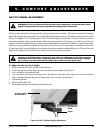
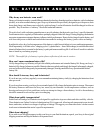
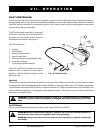
Figure 14. Anti-Tip Wheel Height Adjustment
HEX HEAD CAP
SCREW
JAM NUT
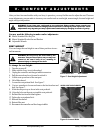
ANTI-TIP WHEEL ADJUSTMENT
WARNING! Consult your authorized Pride provider before attempting to change the anti-tip wheel
height! Changing the anti-tip wheel height affects handling under deceleration!
The Jazzy mid-wheel drive design provides superior performance and safety. The anti-tip wheels are an integral
part of this design because they provide you with stability during deceleration. The anti-tip wheels are preset at the
factory to a height of 1/2-in. off the ground. This is the ideal setting for most Jazzy 1103 users. However, you may
encounter situations where you may need to adjust the anti-tip wheels. For instance, if you drive your Jazzy on
surfaces such as deep pile carpeting, you may notice that the anti-tip wheels have a tendency to drag on the carpet.
In this case, you may need to raise the anti-tip wheels. If you drive your Jazzy primarily on smooth surfaces, such
as linoleum or tile, you may find that you are tipping forward more than is comfortable for you. (This may be more
apparent for lighter users.) In this case, you may need to lower the anti-tip wheels.
WARNING! The higher you raise the anti-tip wheels, the more you increase your power chairs
tendency to tilt forward when coming to a stop. You can compensate for this by having your
authorized Pride provider make a small adjustment to the pre-programmed deceleration setting in
the controller or by moving the seat assembly further to the rear of your power chair.
To adjust the anti-tip wheel height:
1. Remove the seat, the body shroud, and the batteries.
2. Locate the jam nut and hex head cap screw on the anti-tip assembly. See figure 14.
3. Use a wrench to loosen the jam nut.
4. Use a wrench to turn the hex head cap screw. Turn the hex head cap screw clockwise to lower the anti-tip
wheel. Turn the hex head cap screw counterclockwise to raise the anti-tip wheel.
5. Tighten the jam nut.
6. Repeat for the other side.
7. Reinstall the batteries, the body shroud, and the seat.
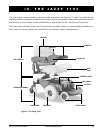
BOTTOM OF MOTOR/
BRAKE ASSEMBLY