


Select Traveller www.pridemobility.com 33
7. Reconnect the battery strap making sure the battery harnesses are secured under the battery strap.
8. Reinstall the battery cover by aligning the tabs as shown in figure 17 and pressing down.
When to See Your Authorized Pride Provider for Service
The following symptoms could indicate a serious problem with your power chair. If necessary, contact your
authorized Pride Provider. When calling, have the model number, serial number, nature of the problem, and the
error code if available.
Motor noise
Frayed harnesses
Cracked or broken connectors
Uneven wear on any of the tires
Jerky motion
Pulling to one side
Bent or broken wheel assemblies
Does not power up
Powers up, but does not move
Corrective Maintenance
If the battery condition meter does not light up when you turn on the power:
Check the harness connections. Make sure they are tight.
Check the circuit breaker. Reset it if necessary.
Check the battery connections.
If the above conditions prove normal, you can load test the batteries with a battery load tester. These testers are
available at automotive parts stores. Disconnect both batteries before load testing and follow the directions that
come with the load tester. If either one of the batteries fails the load test, replace both of them. If your power chair
still does not power up, contact your authorized Pride Provider.
VII. CARE AND MAINTENANCE
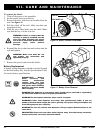
You may need the following to replace your
batteries:
metric/standard socket set and ratchet
adjustable wrench
To replace the batteries:
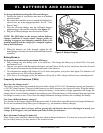
1. Lift up on the battery cover and slide the tabs out
as shown in figure 17.
2. Disconnect the battery strap.
3. Remove the red (+) positive and black (-) negative
battery harness from each battery.
4. Remove the batteries.
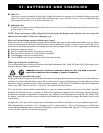
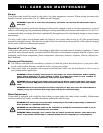
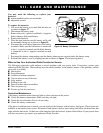
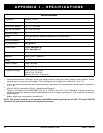
5. Place the new batteries into the battery wells with
the terminals facing out as shown in figure 18.
6. Reconnect the two battery harnesses to the battery
terminals. Make sure the red harness is connected
to the (+) positive terminal and the black harness
is connected to the (-) negative terminal on each
battery.
Figure 18. Battery Orientation
- +
+ -