


Jazzy 614 Series www.pridemobility.com 29
VI. BATTERIES AND CHARGING
Battery Break-in
To break in new batteries for maximum efficiency:
1. Fully recharge any new battery prior to its initial use. This brings the battery up to about 90% of its peak
performance level.
2. Operate your power chair throughout the house and yard. Move slowly at first, and do not travel too far until
you become accustomed to the controls and break in the batteries.
3. Give the batteries another full charge of 8 to 14 hours and operate your power chair again. The batteries will
now perform at over 90% of their potential.
4. After four or five charging cycles, the batteries will top off at 100% charge and last for an extended period.
Frequently Asked Questions (FAQs)
How does the charger work?
The battery charger takes the standard electrical outlet voltage of 120 VAC (alternating current) and converts it
to 24 VDC (direct current). The power chair batteries use direct current to run your power chair. When the battery
voltage is low, the charger works harder to charge the battery. As the battery voltage approaches full charge, the
charger does not work as hard to complete the charging cycle. When the battery is fully charged, the amperage
from the charger is nearly at zero. This is how the charger maintains a charge but does not overcharge the battery.
Can I use a different battery charger?
You should use the charger supplied with the power chair. It is the safest, most efficient tool to charge the batter-
ies. We do not recommend using other types of chargers (e.g., an automotive battery charger).
NOTE: Your power chair’s charger will not operate after the batteries have been discharged to nearly zero
voltage. If this happens, call your authorized Pride Provider for assistance.
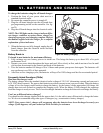
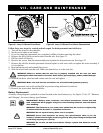
Figure 20. Battery Charging
To charge the batteries using the off-board charger:
1. Position the front of your power chair next to a
standard electrical outlet.
2. Be certain the controller power is turned off.
3. Plug the off-board charger into the off-board char-
ger/programming socket on the controller. See fig-
ure 20.
4. Plug the off-board charger into the electrical outlet.
NOTE: The LED lights on the charger indicate differ-
ent charger conditions at various times: charger on,
charging in progress, and charging complete. Refer to
the manual supplied with the charger for a complete
explanation of these indicators.
5. When the batteries are fully charged, unplug the off-
board charger from the electrical outlet and then
from the controller.