


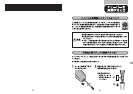

1 Switch off the shaver, remove the adapter from the
wall socket and pull the appliance plug out of the
shaver.
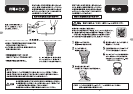
2 Press the release button and pull the shaving unit off
the shaver (Fig. 10).
3 Turn the orange wheel anticlockwise (1) and remove
the retaining frame (2) (Fig. 14).
4 Remove the shaving heads from the shaving unit one
by one (Fig. 15).
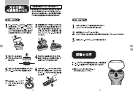
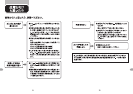
Note: Do not clean more than one cutter and guard at a time,
since they are all matching sets. If you accidentally mix up the
cutters and guards, it may take several weeks before optimal
shaving performance is restored.
5 Remove the guard from the cutter (Fig. 16).
6 Clean the cutter with the short-bristled side of
the brush. Brush carefully in the direction of the
arrows (Fig. 17).
7 Clean the guard with the brush (Fig. 18).
8 Put the shaving heads back into the shaving unit.
9 Put the retaining frame back into the shaving unit and
turn the orange wheel clockwise.
10 Put the shaving unit back onto the shaver.
Storage
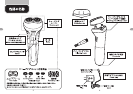
Put the protection cap on the shaver after use to -
prevent damage to the shaving heads (Fig. 8).
Note: Make sure that the lug of the protection cap covers the
release button.
Replacement
Replace the shaving heads every two years for optimal
shaving results.
Replace damaged or worn shaving heads with Philips HQ55
shaving heads.
For instructions on how to remove the shaving heads,
see section ‘Every two months: shaving heads’ in chapter
‘Cleaning’.
ENGLISH ENGLISH
21
22