


PELCO Manual C222M-A (8/95) 3
5.0 INSTALLATION
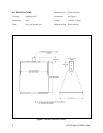
5.1 MRCA/MRWA ADAPTER MOUNTING
1. Determine the mounting location. Remember to
allow for adequate clearance on all sides of the
monitor.
NOTE: When determining the mounting lo-
cation, consideration must be given to the total
weight of the monitor and the mount. The
mounting surface must be adequate to support
this weight.
2. Use the adapter mount as a template to mark the
required mounting holes.
3. Using the necessary fasteners, attach the adapter
mount to the chosen surface.
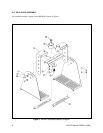
5.2 MR3050 INSTALLATION
1. Determine the width the base mounting brackets
(item 1, Figure 2) must be positioned to in order to
accommodate the monitor being used. Next, attach
the two (2) bracket supports (item 13, Figure 2) to
the base mounting brackets as indicated in Figure
2.
2. Attach the monitor to the base mounting brackets.
If the monitor has removable rubber feet, remove
the screws from the monitor feet and remove the
feet. Use the same hardware to attach the monitor
to the base mounting brackets.
3. Thread the 8" (20.32 cm) pipe supplied into the
ceiling/wall adapter which has already been in-
stalled.
4. Thread collar with cross bar attached onto the end
of the 8" (20.32 cm) pipe attached to the ceiling/
wall mount (already installed).
5. Slide the side brackets (item 2, Figure 2) onto cross
bar and thread on the 1/4-20 bolts. Don't tighten
bolts until all pieces are together.
6. Lift monitor with base pieces attached up to mount.
Attach side brackets to base pieces on monitor us-
ing the four (4) 3/8-16 bolts supplied.
7. Tighten set screws in upper part of collar to lock
mount and collar in place.
8. Tilt the monitor to the desired angle and tighten
bolts on each side of adjusting brackets.
9. Make all necessary electrical connections.