


3
GB
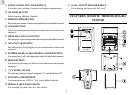
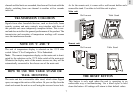
A. TWO-LINE LCD
Displays the current temperature and humidity monitored by
the remote unit
B. LED INDICATOR
Flashes when the remote sensor transmits a reading
C. °C/°F SLIDE SWITCH
Selects between Centigrade (°C) and Fahrenheit (°F)
D. CHANNEL SLIDE SWITCH
Select the remote sensor Channel 1, Channel 2 or Channel 3
E. RESET
Returns all user programmed settings to original factory set
values
F. BATTERY COMPARTMENT
Accommodates two (2) UM-3 or AA-size batteries
G. BATTERY DOOR
H. WALL-MOUNT HOLDER
Supports the remote unit in wall-mounting
I. REMOVABLE TABLE STAND
For standing the remote unit on a flat surface
BEFORE YOU BEGIN
For best operation,
1. Assign different channels to different remote units.
2. Insert batteries for remote units before doing so for the main unit.
3. Initially place both units close together. This will ensure
synchronization between the remote unit and the main unit.
Then, install batteries for the main unit or reset the main unit.
4. Position the remote unit and main unit within effective
transmission range, which, in usual circumstances, is 30 meters.
Note : Building materials and where the main and remote units are
positioned can vastly affect effective range. Try various set-ups for
best result.
Though the remote units are weather proof, they should be
placed away from direct sunlight, rain or snow.
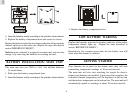
BATTERY AND CHANNEL
INSTALLATION: REMOTE UNIT
The remote thermo-hygro sensor unit uses two (2) UM-3 or “AA”
size batteries.
Follow these steps to install / replace batteries:
1. Remove the screws on the battery compartment.
2. Select the channel number on the [CHANNEL] slide switch.
3. Select the temperature display unit on the °C/°F slide switch.