


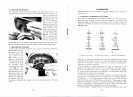

small
light bundles, the effects by diffraction, reflection, refraction, etc.,
may be exaggerated so that fringes may be seen at the image edges which
may likely induce misinterpretation of the image, but it may be effective
for special occassions (e.g. definition of general structure of non stained
specimens). (Fig. 8, c).
2.
Light
Source
As already cited, the iris diaphragm plays an important role In the
illumi-
nation
on microscopy. As a principle the diaphragm should be so adjusted
that
the numerical aperture of the condenser is equal to that of the
objective being used, in order to obtain the maximum resolution. In
practice, however, to keep
out stray light which would
reduce image contrast,
closing the aperture of the
condenser down to 60-
70%
of that of the objec-
tive lens will bring about
a good result in most
cases. The coincidence
of condenser diaphragm
aperture with the opening
(exit pupil) of the objec-
tive can be ascertained
by looking through the
microscope tube after re-
moving
the eyepiece and
closing the diaphragm
slowly. An experienced
user, however, may dispense with such a procedure, and will obtain the
same result by adjusting the diaphragm opening until satisfactory distinct-
ness of the image is obtained.
If a high resolution and, at the same
time,
a high contrast are desirable,
oblique illumination will be effective.
This
is suited especially for lowdyed
specimens, transparent phase-contrast specimens, etc.
However,
in this
illumination,
a remarkable polarity in contrast and resolution may appear;
it
is necessary for observation to change the direction of illumination, by
turning
the iris diaphragm.
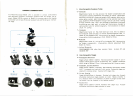
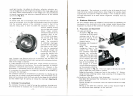
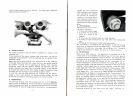
The condenser aperture is off-centered in any direction by rotating and at
the
same time by radially sliding the diaphragm.
This
manipulation can be
done only by using one hand, the thumb and the first finger for off-centering
and the middle finger for opening or closing the diaphragm. (See Fig. 9).
3.
Condenser
Focusing
Knob
The condenser focusing is made by turning the condenser focusing knob.
This
manipulation is necessary only in case of Koehler illumination or dark
-13-
field
observation. The condenser is usually to stay at the upper
limit
and
need not to be lowered, except when a stray image of an outside object
superimposes the specimen image too sharply in such a case as in direct
sun light illumination or as some uneven brightness interferes with the
observation.
4.
Brightness
Adjustment
For this purpose adjust the voltage of current supply by regulating the
transformer of the illuminator or by using a proper neutral density filter.
Adjustment by means of the condenser diaphragm is not at all possible.
5.
Preparation
and
Adjustment
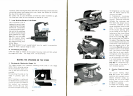
(1) Lamp and Socket
As shown in Fig. 10, lining
up the red dot on the socket
retaining
ring to that on
the
lamp housing, fit the
socket to the housing by
bayonet fashion.
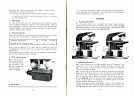
(2) Centering and Focusing of
the
Lamp
Bring the illumination
change-over lever in the
position "M". Stop down
the
condenser diaphragm
beneath the microscope
stage. Move the lamp back
and forth to bring the image
of the filament into sharp
focus on the bottom sur-
face of the diaphragm. For
this
purpose, it is conve-
nient to utilize the reflection
on the
accessory
reflecting
mirror,
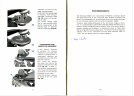
as shown in Fig. 11. Then, turn right or left only the socket
ring
to fasten the lamp socket in position.
Bring the illumination change-over lever to the position "H". Manipu-
lating
the lamp centering screws, make centering of the image on the
condenser diaphragm.
(3) Centering of the Illumination Field Diaphragm
Stop down the opening of the illumination field diaphragm to about
2mm
in diameter.
Viewing through the microscope, focus the objective 40X to the image
of specimen.
Moving up and down the condenser, make a sharp focused image of
the
illumination field diaphragm on the specimen.
—
14—