


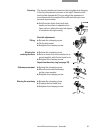
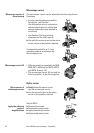

Transmitted-light stand HL
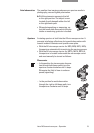
The column seat contains Allen screws.
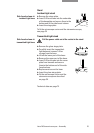
̈ Remove the glass stage plate.
̈ Invert the transmitted-light base and place it on a table.
̈ Hold column against the column seat from underneath.
̈ Insert the Allen screws into the column from the top and
tighten them.
̈ Invert the transmitted-light base and insert the glass
stage plate.
̈ Fit additional components such as the microscope carrier
and optics carrier (page 34).
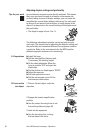
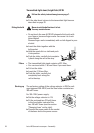
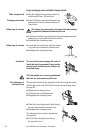
Add a very luminous cold light source and a light guide with
a channel to the transmitted-light stand (TVC, active ∅ 9 mm).
̈ Insert light guide into the base at the rear.
̈ Connect light guide to the light source.
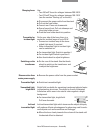
For stereomicroscopes with high apertures such as Leica
MZ12
5, MZ16 and MZ16 A with objective 1.6×, the resolution
can be increased by inserting an accessory condenser.
̈ Push the accessory condenser into the lens holder at the
underside of the transmitted-light base and secure it with
2 Allen screws.
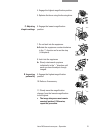
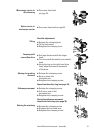
̈ Turn on the light source according to the manufacturer’s
user manual and adjust the light intensity.
̈ Place a transparent object on the glass stage plate and
focus.
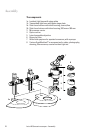
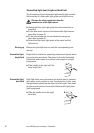
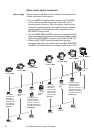
The built-in mirror features a clear and an obscured side and
can be rotated and moved. The obscured side provides a dif-
fused illumination. The angle of incidence in the specimen
plane changes depending on the position of the mirror so that
the transmitted light bright field via oblique illumination can also
generate an illumination similar to dark field.
̈ Rotate and move the mirror with the black rotary knob on the
right side.
̈ Adjust exact bright field and maximum illumination: move
mirror to the stand column until it stops.
Rotate the mirror until it engages in the 45° position.
Detailed information about setup, operation and use can be
found in the separate instructions for use M2-216-2.
Column ➜ Base
Illumination
Accessory condenser
➜ Basis
Use
Tilted mirror
Transmitted-light stand
HL-RC™
27
Leica M Stereomicroscopes – Assembly