


Important: Read complete instructions before beginning installation.
Remove the bath from the carton. Retain the shipping carton until satisfactory inspection of the product has been
made. Do not lift the bath by the plumbing at any time; handle by the shell only.
Immediately upon receipt, inspect the shell before installing. Should inspection reveal any damage or defect in the
finish, do not install the bath. Damage or defect to the finish claimed after the bath is installed is excluded from the
warranty. Jacuzzi Whirlpool Bath's responsibility for shipping damage ceases upon delivery of the products in good
order to the carrier. Refer any claims for damage to the carrier. For definitions of warranty coverage and limitations,
refer to the published warranty information packed with the product.
All bath units are factory tested for proper operation and watertight connections prior to shipping. Note: Prior to
installation, the bath must be filled with water and operated to check for leaks that may have resulted from
shipping damage or mishandling. Jacuzzi Whirlpool Bath is not responsible for any defect that could have been
discovered, repaired, or avoided by following this inspection and testing procedure.
Important: If a skirt is to be used, it must be installed at the time of unit installation – refer to skirt installation
instructions. Install the optional trim parts when all installation has been completed.
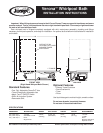
Framing and Support
The optional drain/overflow of the bath extends below the bottom of the bath. Note that this requires a cutout on
the floor.
If the subfloor is level, no other preparation is necessary. You can proceed to install the bath. If the subfloor is not
level, you MUST level the entire surface prior to installing the bath. (Use a floor leveling compound.) Do not level
bath with mortar. Both sides of a joint or splice of subfloor should be level to each other. When attaching flanges
to stud wall, use shims to fill any gaps between the bath flange and studs.
The rim of the bath is not designed to support weight. If finish material is to overlap or contact the bath, the
added weight must be fully self-supporting. The floor structure beneath the bath must be able to support a
total weight of approximately 1022 pounds (bath, water and bather) or 43.5 pounds per square foot.
The protective film liner inside the bath should be left there to prevent damage to the finish from shoes, tools, etc.
during installation and should not be removed until final cleanup.
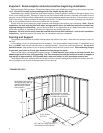
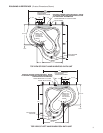
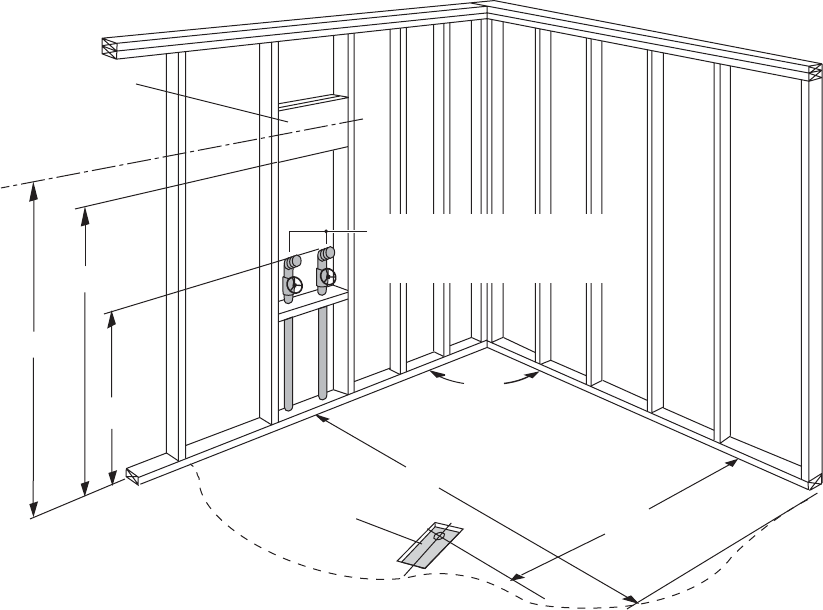
FRAMING DETAILS
2
36"
4"X12" DRAIN
CUT-OUT
34-1/2"
C
L
60"
90º
CUT-OUT IN FLOOR, REFER TO
ROUGHING-IN REFERENCE.
WATER SUPPLY VALVES
(REQUIRED IF INSTALLING
A TOWER ENCLOSURE)
78-3/8"
BLOCKING TWO 2X12
(BLOCKING AND WATER
VALVES REQUIRED IF
INSTALLING A TOWER
ENCLOSURE.)
83-7/8"