


16
CALL TOLL FREE, 1-888-6AURORA
(628-7672)
QUESTIONS ABOUT THIS PRODUCT?
This Procedure Includes the Following:
Removing/Installing the Rear Wheels
Replacing Rear Wheel Handrim
Rear Wheel Axle Mounting Adjustments
WARNING
After making adjustments, always
make sure that parts are properly tight-
ened BEFORE using the wheelchair.
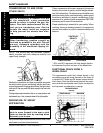
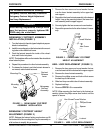
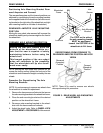
REMOVING/INSTALLING THE REAR
WHEELS (FIGURE 1)
1. Remove the hex screw, axle spacer and lock-
nut that secure the rear wheel to the wheelchair.
NOTE: Observe the position of the axle spacer be-
fore disassembly.
2. Slide the axle spacer onto the hex screw and
loosely install the locknut onto the hex screw.
Refer to FIGURE 1 for correct axle spacer ori-
entation.
NOTE: This will store all necessary parts for future
use.
3. Repeat STEPS 1-2 for the opposite rear wheel.
4. To reinstall the rear wheels onto the wheelchair,
reverse STEPS 1-3.
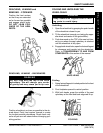
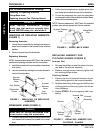
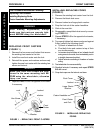
REPLACING REAR WHEEL HANDRIM
(FIGURE 2)
1. Remove the rear wheel from the wheelchair.
2. Remove the button screws and washers that
secure the handrim to the rear wheel.
3. Remove the existing handrim.
4. Install the new handrim by reversing the above
procedures.
5. Reinstall rear wheel to the wheelchair.
6. Repeat the procedure for the opposite rear wheel
if necessary.
Handrim
Button
Screw
FIGURE 2 - REPLACING REAR WHEEL
HANDRIM
PROCEDURE 4 REAR WHEELS
R
E
A
R
W
H
E
E
L
S
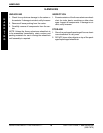
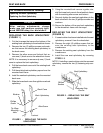
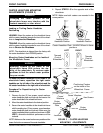
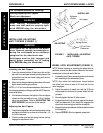
REAR WHEEL AXLE MOUNTING
ADJUSTMENTS (FIGURE 3)
WARNING
The wheel locks MUST be adjusted after
ANY repositioning of the rear wheels.
Rear wheel axle mounting brackets are factory in-
stalled in the forward position.
If repositioning the axle mounting brackets from the
rearward to forward position or vice/versa, the step
of the axle mounting bracket must be positioned on
the outside of the wheelchair.
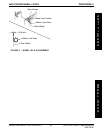
FIGURE 1 - REMOVING/INSTALLING THE
REAR WHEELS
Hex Screw
Axle Mounting
Bracket
Locknut
Rear Wheel
Axle Spacer