


10
3) Remove the expired sensor from the sensor compartment and
carefully pull apart the small white connector that connects the black
and red sensor wires to the analog input wiring.
NOTE: The sensor contains lead and lead acetate, be sure to
dispose of expired sensors in accordance with hospital, local, state
and federal regulations.
4) Remove the new sensor from the package and remove the protective
film from the sensor face.
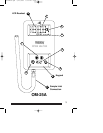
5) Attach the new MAX-250 sensor connector to the MAXO
2
analyzer
input connector. The connector halves are keyed for proper
orientation.
6) Position the sensor in the sensor compartment with the threaded end
of the sensor toward the bottom of the unit and the red and black
wires in the upward position, with the connectors tucked in the
compartment space on the right.
7) Replace the barb fitting in the bottom of the case by turning the barb
clockwise with a
7
/16” wrench. The barb fitting needs to be tightened
firmly against the bottom of the sensor.
8) Slide the battery compartment cover back onto the case. Make sure
the tabs on the cover snap into position.
9) Wait approximately 20 minutes for the sensor to reach equilibrium.
10) Calibrate the new sensor.
NOTE: If the analyzer is on when the sensor is detached and
replaced, the analyzer will automatically force a re-calibration. The
display will read “CAL”.
R213M15K.qxd 6/26/2006 8:59 AM Page 12