


Page 10
7REHWWHUXQGHUVWDQGWKH%UDXQ/&'7URXEOHVKRRWLQJGLVSOD\\RXPXVWÀUVWXQGHUVWDQGWKHQXPEHUVWKDW
DSSHDURQWKHVFUHHQ7KHUHDUH)ODVKLQJ&RGHV6ROLG(UURU&RGHVDQG6ROLG1RUPDO2SHUDWLRQDO&RGHV
)ODVKLQJ&RGHV About 10 seconds after an operation has stopped there are a set of scrolling
ÁDVKLQJQXPEHUVWKDWLQGLFDWHZKHQHYHUDSDUWLFXODUVHQVRURUVZLWFKKDVEHHQDFWLYDWHG7KHVHQXPEHUV
will start at number 65 and scroll up to number 89, then start the sequence over. Remember they are not
HUURUFRGHV.HHSLQPLQGWKDWWKHOLIWZLOOGLVSOD\FRGHVIRUGLIIHUHQWSRVLWLRQVDQGFHUWDLQÁDVKLQJFRGHV
must be present for that position, you will not always get an error code.
6ROLG(UURU&RGHV These are the numbers that will come on the screen when the audible and
visual alarm goes off, and will direct you to where the problem exists. These numbers will only stay on the
VFUHHQIRUDERXWVHFRQGVDQGWKHQWKHÁDVKLQJFRGHVZLOOVFUROOLQGLFDWLQJZKDWVHQVRUVDUHDFWLYH7KLV
sequence of codes will keep repeating. It is important to be looking at the screen when trying to get the lift
to fail.
6ROLG1RUPDO2SHUDWLRQDO&RGHV There are also solid numbers that will appear while and after the lift is
moving that indicate the lift operation and platform position.
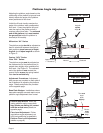
7URXEOHVKRRWLQJ3URFHGXUHV
1. While ORRNLQJDWWKH/&'VFUHHQRSHUDWHWKHOLIWXQWLOWKHIDLOXUHRFFXUV5HDGWKHQXPEHUWKDWFRPHV
RQWKHGLVSOD\WKHPRPHQWWKHDODUPJRHVRIIDQGWKHOLJKWVWDUWVWRÁDVK7KLVFRGHZLOORQO\VWD\RQWKH
screen for 10 seconds.
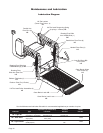
2. Look up the number on the correct error code sheet and determine what part on the lift is causing the
failure. Go to the part on the lift that is suspected of causing the failure and look for anything obvious like
magnets missing, broken wires etc. If nothing is found, the next step is to determine if that sensor is send-
ing a signal to the board.
3. Bring the platform to the level that the sensor should be activated using the backup pump if needed. At
WKLVSRLQWORRNXSWKHÁDVKLQJFRGHWKDWFRUUHVSRQGVWRWKDWVHQVRULQWKHHUURUFRGHVKHHWORRNDWWKH/&'
VFUHHQDQGZDLWIRUWKHÁDVKLQJVFUROOLQJQXPEHUVWRDSSHDU,IWKHQXPEHULVQRWLQFOXGHGLQWKHVFUROOLQJ
numbers, you know that sensor is the problem. You should then check the harness or try another magnet
with the south side of the magnet facing the sensor and see if the number will come up on the display.
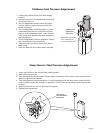
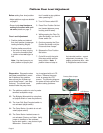
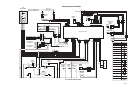
4. If the problem is still not found or the harness is suspected, the voltages should to be checked to and
IURPWKHVHQVRUWRÀQGWKHH[DFWORFDWLRQRIWKHSUREOHP)LUVWGHWHUPLQHWKHZLUHFRORUVIRUWKLVVHQVRUDW
the board and understand the 3 voltage readings needed to operate the sensor, the 12V power, 8V power,
DQGWKH9LQSXWVLJQDOWRWKH3&ERDUGZKHQDFWLYDWHGE\DPDJQHW)LUVWFKHFNIRUD9LQSXWVLJQDO
coming from the sensor to the wire going into the PC board, if there is 11V on this wire, the sensor is not
being activated by the magnet. Next check the 12V and 8V wires at the PC board plug leading to the sen-
VRU2QFHYHULÀHGDWWKHSOXJRQWKH3&ERDUGWKHYROWDJHVVKRXOGWKHQEHFKHFNHGDWWKHQH[WSOXJGRZQ
on the harness going to the sensor until the location of the problem is found.
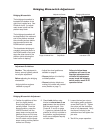
$Q\WLPH\RXVHHWKHFRGHIRUWKDWVSHFLÀFVZLWFK\RXZLOOKDYHYROWVRQWKDWFRORUHGZLUHRQWKHRU
pin connector from that switch. IE: Outboard Barrier is closed “72” will appear on the screen and also 8V
will be present on the signal wire from that switch, if no code is present the voltage will be 11V.
LCD Lift Codes