connecting to AV devices
You can view the recorded movie and photo images(VP-DX103( i )/DX104/DX105( i ) only) on a large screen by connecting
the DVD camcorder to a TV.
CONNECTING TO A TV
• To play back your recordings, the television must be PAL compatible.
page 103
• We recommend that you use the AC power adaptor as the power source
for the DVD camcorder.
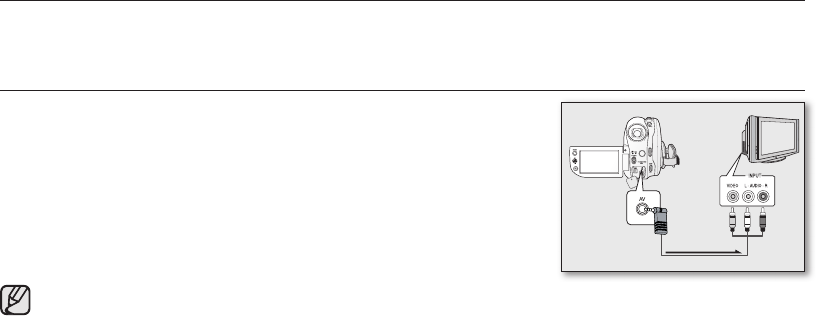
Use the provided AV cable to connect the DVD camcorder to a TV as
follows:
1. Connect the end of the AV cable with the single plug to the AV jack of the
DVD camcorder.
2. Connect the other end with video (yellow) and left(white)/ right(red) audio
cables to the TV.
• For more information about the connection, refer to your TV’s user manual.
• Before connecting, make sure that the volume on TV is turned down: forgetting this may cause feedback
from the TV speakers.
• Carefully connect the input and output cables to the corresponding connections on the device the DVD
camcorder is being used with.
• Make sure to set “AV In/Out” to “Out” before connecting to an external device.
(VP-DX100i/DX103i/DX105i only)
page 81
Viewing on TV screen
1. Turn on the TV and set the input selector to the Input connection the DVD camcorder is connected to.
- This is often referred to as “line.” Refer to the TV instruction manual for how to switch the TV input.
2. Turn the DVD camcorder on.
- Slide the POWER switch downwards, then open the LCD screen.
- Set the appropriate storage media. (VP-DX103(i)/DX104/DX105(i) only)
page 30
- Press the MODE button to set the Play mode.
page 21
- The image from the DVD camcorder will appear on the TV screen.
3. Perform playback.
- You can perform playback, recording or make settings in the menu while viewing on your TV screen.
TV
Signal fl ow
AV cable
DVD camcorder
(AD68-02550G) VP-DX100_ENG_IB.indb 86 2008-03-06 ¿ÀÈÄ 2:31:01


