39
3.
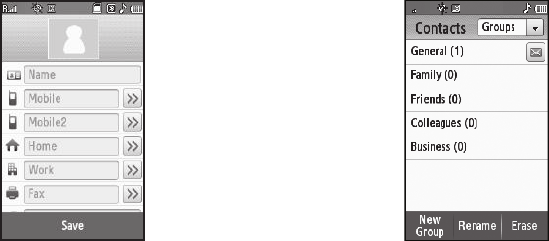
Touch the
Name
field. The
3X4 Keypad text entry screen
appears in the display.
•
If desired, select another text
entry screen. (For more
information, refer to
“Changing
Text Entry Screens”
on
page 52.)
4. Enter a name or phrase to
associate with the new
Contact. (For more
information, refer to “Entering
Text” on page 52.)
5. Touch a phone number field (
Mobile
,
Mobile 2
,
Home
,
Work
,
or
Fax
) or the e-mail address (
E-mail
) field. The 3X4
Keypad text entry screen appears in the display.
•
If desired, select another text entry screen. (For more information,
refer to
“Changing Text Entry Screens”
on page 52.)
6. Enter a number or address for the new Contact. (For more
information, refer to “Entering Text” on page 52.)
7. If desired, assign the new
Contact to a Group. This lets
you send messages to and
find this Contact and other
related contacts. (For more
information, refer to “Group”
on page 44.)
•
The
Select Group
screen
appears in the display. The
following groups are available:
–
New Group
–
Family
–
Friends
–
Colleagues
–
Business
•
Select the preferred group. A message pops-up confirming the
group assignment for this Contact.
8. If desired, select a unique Ringtone or voice memo file to
identify this new Contact. (For more information, refer to
“Ringer Type” on page 111.)


