445580-EU-EN v3.6 07/13
3
Calibration and Verification Procedures
The following procedures require 33% & 75% RH references available through Extech.
Verification (Checking the 33% or 75% RH Calibration)
Skip the verification and go directly to the Cal procedure below if it has already been determined
that the meter calibration is compromised or if the E2 display appears.
1. Insert meter’s sensor into the 33% or 75% salt reference bottle
2. Place the meter and bottle inside the meter case
3. Wait 40 minutes and then check if the reading is within the published specifications
Relative Humidity Calibration (33% and 75%)
For best results, store the meter and salt bottles in the closed case during the 40-minute
stabilization process. The 33% and the 75% calibrations must both be performed.
1. Start with the meter OFF.
2. Insert the meter’s sensor into the 33% salt reference bottle. Put the meter and
the bottle in the case and close the case. Allow the meter to stabilize for 40
minutes. Note that for diagnostic purposes the stabilization process can be
shortened to 5 minutes.
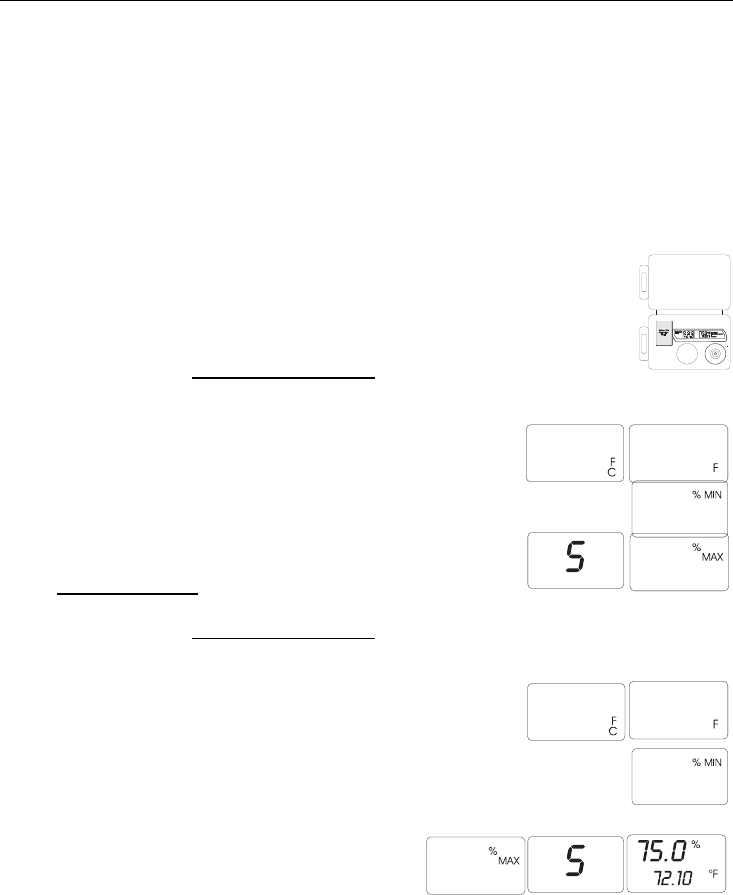
3. Open the case but leave the pen in the bottle. While holding down the recessed
CAL button with a paper clip, press and release the ON-OFF button. Continue to hold down
the CAL button, the unit will turn ON and the display will flash once.
4. When only the F and C icons appear, release the CAL button.
After releasing the CAL button, the display will indicate either F
or C (depending on which one was selected).
5. Press and hold the RESET button for 3 seconds. %MIN will
appear in the display after the RESET button is released.
6. Press and release the CAL button. ‘S’ will briefly display
followed by %MAX display.
7. Turn the meter OFF. Insert the meter sensor into the 75% salt
reference bottle. Put the meter and the bottle in the case and close the case. Wait 40 minutes.
8. Open the case but leave the pen in the bottle. While holding down the recessed CAL button
with a paper clip, press and release the ON-OFF button. Continue to hold down the CAL
button, the unit will turn ON and the display will flash once.
9. When only the F and C icons appear, release the CAL button.
After releasing the CAL button, the display will indicate either F
or C.
10. Press and hold the RESET button for 3 seconds. %MIN will appear in the
display after the RESET button is released.
11. Press and hold the RESET button again for 3 seconds. %MAX will appear
after the key is released.
12. Ensure that %MAX is displayed and then press
CAL. ‘S’ will appear briefly and the meter will
return to normal operation. Turn the power OFF;
calibration is complete.