433201A-EN v1.6 07/13
4
Operation
Measurement Mode
1. Open the meter lid and press the POWER/MODE button to turn the meter on. “MEASURE”
will be displayed on the LCD screen. Check the battery if the meter display does not switch
on.
Note: For best accuracy, remove any input connectors before turning the unit ON. The
meter will not perform a correct self calibration if there is an input connected.
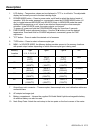
2. Select the thermocouple type using the TYPE button. The T/C type selected will be indicated
along the bottom of the display. Each time the TYPE button is pressed the indicator will
advance one type.
3. Select
o
C or
o
F via the
o
C/
o
F button.
4. Carefully insert the thermocouple probe into the sub-miniature female connector on the side
panel.
5. Read the temperature on the LCD display.
6. To turn the meter off, press and hold the POWER/MODE button for more than 2 seconds.
Offset Adjustment
Thermocouples produce an output signal that is non-linear. In some instances it may be necessary to
offset the reading to compensate for the non-linearity of the thermocouple.
1. In Measurement Mode, press and hold the ▼/▲buttons together until ”OFS” is displayed on
the LCD.
2. Use the ▼/▲ buttons to adjust the offset from -9.0 to 9.0
o
F (-5.0 to 5.0
o
C)
3. Press and hold the ▼/▲buttons together for less than 2 seconds to save the offset and
return to Measurement Mode.