Model 421509 Version 1.1 09/04
8
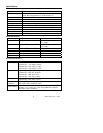
Interval Time Setting
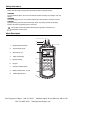
To set up the interval time for the log function, press the [INVT] button. The indicator “INV”
will blink at the top right of the LCD and previous settings are displayed. Press the number
buttons (printed in white) on the overlay to change the time setting. Setting changes from
left to right in the following format: HH:MM:SS. Press the ENTER button to confirm. Press
the “ESC” button to exit this function.
HH: 0-23
MM: 0-59
SS: 0-59
MAX: 23:59:59
MIN: 00:00:01
Auto Power Off Time Setting
Press the [APO] button in Setup Mode. The indicator “APO” and the main display will blink
on the LCD showing the previous setting. Press the number buttons (printed in white) on
the overlay to change the APO time. Press the ENTER button to confirm. To exit this
function without changing the setting, press the ESC button.
MAX: 19999 minutes
MIN: 0005 minutes
Thermocouple Offset Adjustment
To change the offset for T1, the main display input should be set to T1. Set the main
display to T2 for adjusting the offset to T2. Press the [OFS] button to enter the offset
adjustment mode. “CAL” will be displayed on the top right of the LCD and the main display
will blink showing the previous setting. Press the number buttons (printed in white) on the
overlay to change the offset. The resolution is 0.1°. Use the “-” button to set a negative
value. Press the ENTER button to confirm.
MAX: ±1999.9°C/°F
System Time Setting
To set or change the system time, press the [TIME] button in Setup Mode. The time and
date in the bottom right display will blink. Enter from left to right YY:MM:DD and
HH:MM:SS. Press the number buttons (printed in white) on the overlay to change the
settings. Press the ENTER button to confirm. Exit this function by pressing the ESC button.